Creating Custom Status Dolls
Created by: Burnt Kona - Website: Burnt Kona's Coffee House
Tutorial copied with the friendly permission from Identity Crisis .
Creating a custom HUD status doll to your player model is quick and easy, yet adds much to the look of your model in game. All that is needed is two extra lines of code in for model's main .uc file, and two additional texture map. So, lets get on with it! I suggest exporting the original UT status dolls through UnrealEd to get a good handle of what is going on.
The Textures
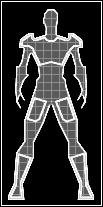
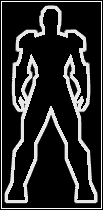
First, create a new rgb bitmap 256 pixels in height and 128 pixels in width. On this bitmap, create a silhouette image of your player model. For best results, use the same methods as epic: that is having the silhouette filled with grey (rgb 90,90,90), with a grid of lighter grey lines (rgb 138,138,138) and an outline of the silhouette and the edges of armour and boots picked out in pure white (rgb 255,255,255).
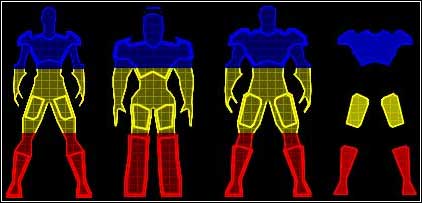
Take care where you place the chest armour, thigh armour and jump boots on the silhouette, as they must appear in certain parts of the bitmap. The main armour must appear in the top 64 pixels (i.e. pixel rows 0 to 63) of the bitmap, the thigh pads in the next 64 (pixels 64 to 127), and the jump boots in the next 64 (pixel rows 128 to 191). The bottom 64 pixels are unused, although you could put your model's name or some sort of logo there (it will appear below the status doll).
Save a copy bitmap as an rgb image at the moment, we will need it later.
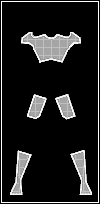
Right, with a copy of that bitmap safely tucked away, it's time to start cutting up the original. Get rid of everything but the boots, and armour parts. Adjust the balance/levels or just repaint, so that the grey fill-in is now rgb 171,171,171 and the gridline grey is rgb 194,194,194. Save an rgb copy of this bitmap.
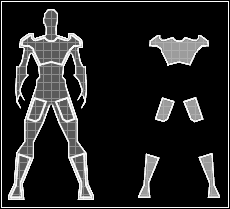
Create a new blank bitmap, 256 by 256 pixels, and paste the first bitmap you created (the full silhouette) on the left side of the blank bitmap, and the armour/boots bitmap on the right. Convert this bitmap to a greyscale image, then to 8-bit index coloured. Save it as a .pcx file called Iyourmodelname2.pcx in a directory called 'textures' in your model's working folder (so you now have 'models', 'classes' and 'textures' folders in your model's working directory)
One last bitmap to create. Start a new bitmap, with a width of 128 and a height of 256. What you want to do on this bitmap is create the outer glow of the shieldbelt. It should be pure white the inside, but soften the outside edges a bit. Again, convert it to a greyscale image, then to 8-bit index coloured. Save as a .pcx file called IyourmodelnameSBelt.pcx in your model's textures directory.
Scripting and Compiling
Believe it or not, that is all the hard work done. Just add the following lines to your model's main .uc file, (not the selectdude or bot .uc), substituting the yourmodelname for, well, YOUR model's name
#exec TEXTURE IMPORT NAME=yourmodelname Doll FILE=TEXTURES\HUD\Iyourmodelname2.PCX GROUP="Icons" MIPS=OFF
#exec TEXTURE IMPORT NAME=yourmodelnameBelt FILE=TEXTURES\HUD\IyourmodelnameSBelt.PCX GROUP="Icons" MIPS=OFF
And these lines of code in the default properties sections of both the player class and the bot class:
StatusDoll=Texture'your model's working directory.Icons.yourmodelnameDoll'
StatusBelt=Texture'your model's working directory.Icons.yourmodelnameBelt'
Then just ucc-make as normal... the .pcx's are compiled into the .u file along with the model.
Created by: Burnt Kona - Website: Burnt Kona's Coffee House
Tutorial copied with the friendly permission from Identity Crisis .
Creating a custom HUD status doll to your player model is quick and easy, yet adds much to the look of your model in game. All that is needed is two extra lines of code in for model's main .uc file, and two additional texture map. So, lets get on with it! I suggest exporting the original UT status dolls through UnrealEd to get a good handle of what is going on.
The Textures

First, create a new rgb bitmap 256 pixels in height and 128 pixels in width. On this bitmap, create a silhouette image of your player model. For best results, use the same methods as epic: that is having the silhouette filled with grey (rgb 90,90,90), with a grid of lighter grey lines (rgb 138,138,138) and an outline of the silhouette and the edges of armour and boots picked out in pure white (rgb 255,255,255).

Take care where you place the chest armour, thigh armour and jump boots on the silhouette, as they must appear in certain parts of the bitmap. The main armour must appear in the top 64 pixels (i.e. pixel rows 0 to 63) of the bitmap, the thigh pads in the next 64 (pixels 64 to 127), and the jump boots in the next 64 (pixel rows 128 to 191). The bottom 64 pixels are unused, although you could put your model's name or some sort of logo there (it will appear below the status doll).
Save a copy bitmap as an rgb image at the moment, we will need it later.
Right, with a copy of that bitmap safely tucked away, it's time to start cutting up the original. Get rid of everything but the boots, and armour parts. Adjust the balance/levels or just repaint, so that the grey fill-in is now rgb 171,171,171 and the gridline grey is rgb 194,194,194. Save an rgb copy of this bitmap.

Create a new blank bitmap, 256 by 256 pixels, and paste the first bitmap you created (the full silhouette) on the left side of the blank bitmap, and the armour/boots bitmap on the right. Convert this bitmap to a greyscale image, then to 8-bit index coloured. Save it as a .pcx file called Iyourmodelname2.pcx in a directory called 'textures' in your model's working folder (so you now have 'models', 'classes' and 'textures' folders in your model's working directory)

One last bitmap to create. Start a new bitmap, with a width of 128 and a height of 256. What you want to do on this bitmap is create the outer glow of the shieldbelt. It should be pure white the inside, but soften the outside edges a bit. Again, convert it to a greyscale image, then to 8-bit index coloured. Save as a .pcx file called IyourmodelnameSBelt.pcx in your model's textures directory.

Scripting and Compiling
Believe it or not, that is all the hard work done. Just add the following lines to your model's main .uc file, (not the selectdude or bot .uc), substituting the yourmodelname for, well, YOUR model's name
#exec TEXTURE IMPORT NAME=yourmodelname Doll FILE=TEXTURES\HUD\Iyourmodelname2.PCX GROUP="Icons" MIPS=OFF
#exec TEXTURE IMPORT NAME=yourmodelnameBelt FILE=TEXTURES\HUD\IyourmodelnameSBelt.PCX GROUP="Icons" MIPS=OFF
And these lines of code in the default properties sections of both the player class and the bot class:
StatusDoll=Texture'your model's working directory.Icons.yourmodelnameDoll'
StatusBelt=Texture'your model's working directory.Icons.yourmodelnameBelt'
Then just ucc-make as normal... the .pcx's are compiled into the .u file along with the model.

