
Understanding Mesh Layouts
Created by : Redlemons
Tutorial copied with the friendly permission from Identity Crisis .
Introduction
Looking at skin meshes in general, they can be extremely complicated to a newbie, they can be complicated enough to put them off skinning forever. However, once you get used to how the triangles look on a 2D bitmap and on the 3D model it can be easier to understand what goes where.
There is two different ways top do this, but it's very handy to use them in conjunction with one another - The Triangle method, and the Gradient method. Both are described below.
----------------------------------------------
Triangle Method:
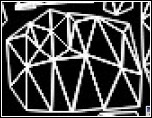
Wireframe mesh
First of all you're going to focus on a particular part of the model. In this example I am using a model from Quake 3, but it really doesn't matter what model I use really.
Doom's boot texture, located just left of the middle on the wireframe mesh. Right now it's almost impossible to tell what is what.
Setup the options box
Make a new layer, call it Triangles or something similar. Set up your Draw tool options to look like this. Make your primary colour pure white and use the right mouse button to select contrasting colours from the colour palette as you go.
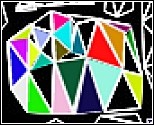
Triangles
On the Triangles layer draw triangles like these. If you've got the options set up as above all you will need to do is draw three dots (using the line tool) at the corners of of the triangles, then right click and click 'Quit Node Editing'. Now you'll have a colourful triangle with a white edge. Now use the right mouse button, select a different colour and do the same thing on another triangle. Keep doing this until all the triangles are filled. It is OK to use the same colour more than once (I have used light blue twice on the left) as long as they are not surrounded by triangles of similar colours.
Onto the model
Now take a look in your model viewer and select the appropriate skin. You'll see on Doom's boot that the triangles are all in place. Now you can see that the pink triangle alongside the black one and above the light blue triangle is the tongue of his boot. And the pink, dark green and dark purple triangles make up the front of the boot.
Hopefully this method will give you a better understanding of how the mesh is applied to the model. It also gives you an indication of the size of the individual triangles and how much mesh space is devoted to each polygon.
Gradient Method
Start with a blank mesh
As with Method 1, you start with a blank mesh, once again I'm using Doom's boot as an example.
Once again, tool options
This time you're setting up the flood fill options a little differently. Choose two contrasting colours for your primary and secondary colours, set the style to Linear Gradient. Select the boot area and on a new layer, fill the selected area with colour.
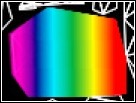
Many colours
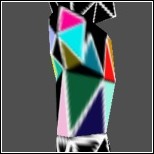
Your mesh should look a little something like this. Depending on how many colours you used and what they were, your version may differ from this. That's OK, as long as there are a few different colours. If there aren't, feel free to draw your own on there using a low opacity and hardness.
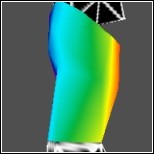
The result
And this is the result. This way you can see that the green area on the mesh corresponds to the side of the boot, the red area is the back and the dark and light blue areas are the front of the boot.
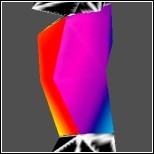
Seams
The picture on the below shows the obvious seam on the boot where the texture has wrapped around and met itself. You can see that this is where the red and purple parts meet. This seam isn't as easy to spot using the triangle method. Now that you know the seam is there before you actually start skinning you can find a way to work around it or disguise it. If you had started skinning and almost finished your masterpiece and discovered that seam so far into your work, quite a few problems could arise.
Conclusion
So those are the two things I do before I ever start a skin. I check how much space is devoted to which area of the skin and where the major seams are. Both methods have their good and bad points:
Triangle Method
Pros: Easy to see how much space is devoted to polygons, very easy to see where individual polygons are located.
Cons: Time consuming, almost impossible to spot seams.
Gradient Method
Pros: Very quick, easy to spot seams.
Cons: Difficult to see how much texture space is allocated to polygons.
The best thing to do? Use both methods before starting a skin.
Created by : Redlemons
Tutorial copied with the friendly permission from Identity Crisis .
Introduction
Looking at skin meshes in general, they can be extremely complicated to a newbie, they can be complicated enough to put them off skinning forever. However, once you get used to how the triangles look on a 2D bitmap and on the 3D model it can be easier to understand what goes where.
There is two different ways top do this, but it's very handy to use them in conjunction with one another - The Triangle method, and the Gradient method. Both are described below.
----------------------------------------------
Triangle Method:
Wireframe mesh
First of all you're going to focus on a particular part of the model. In this example I am using a model from Quake 3, but it really doesn't matter what model I use really.
Doom's boot texture, located just left of the middle on the wireframe mesh. Right now it's almost impossible to tell what is what.
Setup the options box
Make a new layer, call it Triangles or something similar. Set up your Draw tool options to look like this. Make your primary colour pure white and use the right mouse button to select contrasting colours from the colour palette as you go.
Triangles
On the Triangles layer draw triangles like these. If you've got the options set up as above all you will need to do is draw three dots (using the line tool) at the corners of of the triangles, then right click and click 'Quit Node Editing'. Now you'll have a colourful triangle with a white edge. Now use the right mouse button, select a different colour and do the same thing on another triangle. Keep doing this until all the triangles are filled. It is OK to use the same colour more than once (I have used light blue twice on the left) as long as they are not surrounded by triangles of similar colours.
Onto the model
Now take a look in your model viewer and select the appropriate skin. You'll see on Doom's boot that the triangles are all in place. Now you can see that the pink triangle alongside the black one and above the light blue triangle is the tongue of his boot. And the pink, dark green and dark purple triangles make up the front of the boot.
Hopefully this method will give you a better understanding of how the mesh is applied to the model. It also gives you an indication of the size of the individual triangles and how much mesh space is devoted to each polygon.
Gradient Method
Start with a blank mesh
As with Method 1, you start with a blank mesh, once again I'm using Doom's boot as an example.
Once again, tool options
This time you're setting up the flood fill options a little differently. Choose two contrasting colours for your primary and secondary colours, set the style to Linear Gradient. Select the boot area and on a new layer, fill the selected area with colour.
Many colours
Your mesh should look a little something like this. Depending on how many colours you used and what they were, your version may differ from this. That's OK, as long as there are a few different colours. If there aren't, feel free to draw your own on there using a low opacity and hardness.
The result
And this is the result. This way you can see that the green area on the mesh corresponds to the side of the boot, the red area is the back and the dark and light blue areas are the front of the boot.
Seams
The picture on the below shows the obvious seam on the boot where the texture has wrapped around and met itself. You can see that this is where the red and purple parts meet. This seam isn't as easy to spot using the triangle method. Now that you know the seam is there before you actually start skinning you can find a way to work around it or disguise it. If you had started skinning and almost finished your masterpiece and discovered that seam so far into your work, quite a few problems could arise.
Conclusion
So those are the two things I do before I ever start a skin. I check how much space is devoted to which area of the skin and where the major seams are. Both methods have their good and bad points:
Triangle Method
Pros: Easy to see how much space is devoted to polygons, very easy to see where individual polygons are located.
Cons: Time consuming, almost impossible to spot seams.
Gradient Method
Pros: Very quick, easy to spot seams.
Cons: Difficult to see how much texture space is allocated to polygons.
The best thing to do? Use both methods before starting a skin.