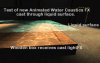
For those still having trouble sorting out how this FX can be reproduced
In Ued texture browser look in the map mylevel texture pack, and open the properties of the “SidewalkDrain” texture by right clicking on it and choosing “properties” .
A window will pop up showing the texture and to its right a menu with a bunch of properties click on the bottom one that says “Texture” and it will expand down to show a list.
On this list you will see the “Macrotexture” option is set to WetTexture'MyLevel.CausticL'.
This tells the engine that we want to overlay that WetTexture on top of this drain texture, combining them together.
That’s all there is to the trick, use “Macrotexture” to mix the two textures together
Now to make your own,
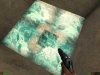
Step A: make your first texture a 256x256 Caustic texture
To make the Caustic texture I used Caustics Generator v1.4
With the background RGB colors all set to =128, so it is gray.
You can read more about Caustics Generator, and download here
http://www.lysator.liu.se/~kand/caustics/
Step B: import this texture into Ued, I used the Mylevel package.
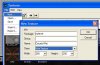
Step C: now for the second texture, in the texture browser under file select “New”, a window will pop up “New Texture”, fill out the needed info, and under the “class:” option select “Wet Texture”. See first attached pic below.
This will pop up a Texture Properties window with a blank texture, you can now go back to the texture browser and find the first texture you imported and select it.
Then return to the Texture Properties window of your Wet Texture, and look under its properties, click on the bottom one that says “WaterPaint” and it will expand down to show a list, look down this list to where it says “Source Texture” and click it.
Buttons will then pop up, just press the one that says “Use”. It should now have set the choice to your first imported texture.
If not go back to the browser and make sure you have your first texture selected, a try setting “Source Texture” option again.
When it is set, you can then have fun playing with painting drops on the canvas of your “Wet Texture”. When you have added a few ripples you are ready for the next step.
Step D: import a new third texture, this will be a surface that we want the caustics to shine on, in my map I called it “SidewalkDrain”.
Open the properties of this third texture, “SidewalkDrain” by right clicking on it and choosing “properties”.
A window will pop up showing the texture and to its right a menu with a bunch of properties click on the bottom one that says “Texture” and it will expand down to show a list.
On this list you will see the “Macrotexture” option, we need to set this to use our “Wet Textur” we just made in step C.
So go back to the texture browser and make sure our second texture “Wet Texture” is selected, then return to the properties window and click on the “Macrotexture” option and press the “use” button.
It should now have set the “Macrotexture” choice to use the Second texture.
If not go back to the browser and make sure you have your Second texture selected, a try setting “Macrotexture” again.
This third texture is now ready for use in your map.
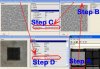
See attached pic below illustrating the steps of the process.