
Hey i read a thread about portraits and was about to reply with a small tut on how to create them, when i relised that the guy just wanted to add the pic ingame. So i decided that i would post the tutorial anyways because it took about 5 minutes to type, and i didnt wanna waste that 5 mins  This is for people who really are clueless, or are to lazy to figure this stuff out
Grab ur self a copy of paint shop pro 7, or a trial or wat eva, then Create a base image of 256x512 pixels (thats 256 wide, and 512 tall/verticaly/hieght/wat eva). Now find the Fill option, in the side menu, right click it and select gradient. now click the color of the gradient, and it will come up with the Edit option. Muck around until u find what color suits your character best, and what combination u are going to use. Then fill the empty image.
Now to get Ur character looking good for his/her photo shoot, u need to open the Unreal Editor(It is shipped with the game, and if it wasnt shipped with yours, there something wrong ), Click the animations tab, and open Your character Animation file. Near the top of the 3D view window thing, There will be some buttons. Move u mouse over each one of these until u find the pose animation. I used the Idle talk animation for EvilEngines AVP 2 Predator Conversion, and you can use what eva you choose. When you have positioned ur character, print screen and paste the file into PSP. Now the background in the pasted image should be Dark grey with with lighter grey grd lines. Get rid of these with the Color Replacer tool, preferably with black as the replacement color.
When all the unecessary colors are gone, and there is only the black background, press CTRL + a to select the entire image, the go to Selections -> Modify -> Transparent color. Then select black as the replacement color. Then click ok. Now go back to your character image and CTRL + c. Then click on the Background image that we prepared earlier, and press CTRL + v to paste the character. Position it on the background and viola!! A nice New Character portrait. Please keep in mind that there mite be a better way to do this, and that this is my first Tutorial EVER, so if there are any mistakes.... THEN DEAL WITH IT! Nah if there are any mistakes then tell me and i will procrustinate a little bit before i fix it
P.S: this tutorial is meant for Un-nerdish people who want to become nerds by means of unreal tournament
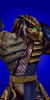
P.P.S: I have just put a picture of the ancient pred that i did with the above technique. Thanx to EvilEngine For the conversion, and for all his other great models!
This is for people who really are clueless, or are to lazy to figure this stuff out Grab ur self a copy of paint shop pro 7, or a trial or wat eva, then Create a base image of 256x512 pixels (thats 256 wide, and 512 tall/verticaly/hieght/wat eva). Now find the Fill option, in the side menu, right click it and select gradient. now click the color of the gradient, and it will come up with the Edit option. Muck around until u find what color suits your character best, and what combination u are going to use. Then fill the empty image.
Now to get Ur character looking good for his/her photo shoot, u need to open the Unreal Editor(It is shipped with the game, and if it wasnt shipped with yours, there something wrong
), Click the animations tab, and open Your character Animation file. Near the top of the 3D view window thing, There will be some buttons. Move u mouse over each one of these until u find the pose animation. I used the Idle talk animation for EvilEngines AVP 2 Predator Conversion, and you can use what eva you choose. When you have positioned ur character, print screen and paste the file into PSP. Now the background in the pasted image should be Dark grey with with lighter grey grd lines. Get rid of these with the Color Replacer tool, preferably with black as the replacement color.When all the unecessary colors are gone, and there is only the black background, press CTRL + a to select the entire image, the go to Selections -> Modify -> Transparent color. Then select black as the replacement color. Then click ok. Now go back to your character image and CTRL + c. Then click on the Background image that we prepared earlier, and press CTRL + v to paste the character. Position it on the background and viola!! A nice New Character portrait. Please keep in mind that there mite be a better way to do this, and that this is my first Tutorial EVER, so if there are any mistakes.... THEN DEAL WITH IT!
Nah if there are any mistakes then tell me and i will procrustinate a little bit before i fix it P.S: this tutorial is meant for Un-nerdish people who want to become nerds by means of unreal tournament
P.P.S: I have just put a picture of the ancient pred that i did with the above technique. Thanx to EvilEngine For the conversion, and for all his other great models!
Attachments
Last edited: