
Paint Chips
Created by : Redlemons
Tutorial copied with the friendly permission from Identity Crisis .
Introduction
Characters, maps, weapons... in video games these are commonly made out of metal. Given the nature of video games, this metal is rusty, dirty, chipped or dented. In this tutorial you'll see how to achieve a chipped paint effect in hardly any time at all.
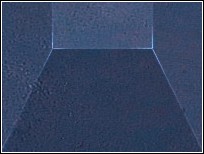
Step 1. A base
This is just a simple metallic texture, coloured blue and with some highlights added. The highlights are in the most obvious places, at the pointiest parts where the light be the strongest.
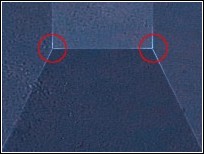
Step 2. Chips? Where?
As this piece of metal is pointy and three dimensional, the most likely place for the paint to chip and flake off is at the part that sticks out the most and would get bumped often. Obviously, this is also where the highlights would appear. The areas circled in red are roughly where the paint chips would appear and the plain metal below the paint would show through.
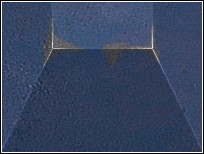
Step 3. Basics
Create a new layer, set its blend mode to Colour. Use a small brush, only 1 pixel wide, and set its hardness and opacity to about 25 each and use a light grey colour.. On this layer, simply paint where you would expect the metal below to show through. In a way you're erasing the blue paint above. When you're done with this, select the grey area you've just painted and save the selection for use later if necessary. With this area still selected, usethe Adjust Brightness/Contrast tool to make the metal darker but more contrasting. I used strengths of about 25 and 15 respectively.
Step 4. Highlights
Since these areas of paint have been chipped away, you can bet that the surrounding paint has been weakened and is peeling away from the metal slightly. To achieve this effect, create a new Dodge layer and with a very small brush (1 pixel wide) and using a light grey colour, draw gentle lines around some areas of the paint. Play with the opacity of this layer - you want it to be only just noticeable.
Step 5. ... and shadows
Along with the highlight come the shadows. Since this peeling paint is raised slightly, the light isn't as bright underneath here so a few shadows are in order. Create a new layer, use a brush the same as the one used above but use black instead of light grey. Now paint some gentle shadows around the areas (mainly in the areas towards the top of the metal). These areas don't have to be only 1 pixel wide - to give a sense of differing depths you can make the shadows wider or more narrow.
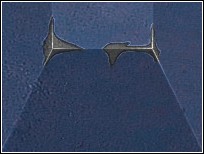
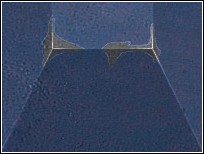
Final image

Conclusion
The final image there is a zoomed in image of Step 5. You may want to adjust the highlights of the metal areas as they would most likely catch more light than the painted areas. This example shows a pretty clean paint chip - you may choose to have a dent in one of the points or even have the paint worn away in a less clean manor.
Created by : Redlemons
Tutorial copied with the friendly permission from Identity Crisis .
Introduction
Characters, maps, weapons... in video games these are commonly made out of metal. Given the nature of video games, this metal is rusty, dirty, chipped or dented. In this tutorial you'll see how to achieve a chipped paint effect in hardly any time at all.
Step 1. A base
This is just a simple metallic texture, coloured blue and with some highlights added. The highlights are in the most obvious places, at the pointiest parts where the light be the strongest.
Step 2. Chips? Where?
As this piece of metal is pointy and three dimensional, the most likely place for the paint to chip and flake off is at the part that sticks out the most and would get bumped often. Obviously, this is also where the highlights would appear. The areas circled in red are roughly where the paint chips would appear and the plain metal below the paint would show through.
Step 3. Basics
Create a new layer, set its blend mode to Colour. Use a small brush, only 1 pixel wide, and set its hardness and opacity to about 25 each and use a light grey colour.. On this layer, simply paint where you would expect the metal below to show through. In a way you're erasing the blue paint above. When you're done with this, select the grey area you've just painted and save the selection for use later if necessary. With this area still selected, usethe Adjust Brightness/Contrast tool to make the metal darker but more contrasting. I used strengths of about 25 and 15 respectively.
Step 4. Highlights
Since these areas of paint have been chipped away, you can bet that the surrounding paint has been weakened and is peeling away from the metal slightly. To achieve this effect, create a new Dodge layer and with a very small brush (1 pixel wide) and using a light grey colour, draw gentle lines around some areas of the paint. Play with the opacity of this layer - you want it to be only just noticeable.
Step 5. ... and shadows
Along with the highlight come the shadows. Since this peeling paint is raised slightly, the light isn't as bright underneath here so a few shadows are in order. Create a new layer, use a brush the same as the one used above but use black instead of light grey. Now paint some gentle shadows around the areas (mainly in the areas towards the top of the metal). These areas don't have to be only 1 pixel wide - to give a sense of differing depths you can make the shadows wider or more narrow.
Final image
Conclusion
The final image there is a zoomed in image of Step 5. You may want to adjust the highlights of the metal areas as they would most likely catch more light than the painted areas. This example shows a pretty clean paint chip - you may choose to have a dent in one of the points or even have the paint worn away in a less clean manor.