Metal Highlights
Created by : Redlemons
Tutorial copied with the friendly permission from Identity Crisis .
Introduction
Unreal Tournament: The lighting system is pretty complex (or was, when it was released!) but it still isn't perfect. You still have to do some tricks to make your character to look like he's wearing shiny metal armour, bloody boots, dusty clothes and the like. This is a basic tutorial telling you about how to create realistic-looking glints of metal and where they should appear.
Step 1. Make a metal texture
You can see here that I've created a metal texture (see the metal texture tutorial) and selected a border of a few pixels. Using the dodge and burn tools, lighten the top surfaces and darken the bottom ones to create a three dimensional look.

Step 2. Make the first highlight
Create a new layer and use Dodge as its blend mode. Call this 'Dodge 1'. Use the Draw tool to make a single line of about 1 pixel wide using the colour 192,192,192 (a light grey). Draw the line similar to the one on the left. Now get the Eraser tool with Opacity 5 and Hardness 5 and erase the middles of the line very lightly. This makes the corners more prominent. Now Gaussian Blur it at a strength of 1 to make the line a little less obvious.

Step 3. Make a second, sharper highlight
Create another Dodge layer and repeat the same steps, but this time don't blur anything. Call this layer 'Dodge 2'.

Step 4. Draw a darker line
Copy the 'Dodge 2' layer. Create a new layer, call it 'Burn 1' and choose Burn as its blend mode. Now paste the 'Dodge 1' layer onto 'Burn 1' and it will magically turn darker, instead of lighter. Move this to just below the lighter lines.

Step 5. Add more details
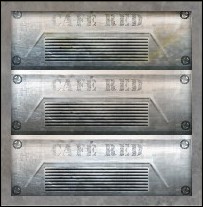
That is the very basic way of creating good highlights. It's always easier to use a Dodge layer than it is to use the Dodge tool. It gives you more control over what you're creating. For now, merge the layers and add some more details. Scratches, stains, rust, pipes, dials - everything works. You can see in the image below what a few details can do to make it look more realistic.
Final image
Examples
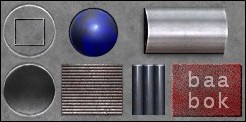
You can see in the below image a few examples of the highlights and shadows that occur when light falls on different metals. You can see that the shallow ring indents in the metals cause highlights to be below the darker lines (giving an inner bevel look). Protruding rings cause the highlights to be above the darker lines (giving an outer bevel look). The blue sphere catches a very sharp point of light towards its centre. The rusted grille doesn't catch a sharp point of light - instead it just reflects some light near the bottom, giving the effect that it has come away from the metal. The chrome catches multiple points of light (have a look at the chrome tutorial), as well as the surrounding colours.
Different metals
Conclusion
Metals are by far the most popular texture used in video games. They're used for wall, ceiling and floor textures, armour, weapons, and robotic-type skins. Because of this it's important to get it looking right.
Created by : Redlemons
Tutorial copied with the friendly permission from Identity Crisis .
Introduction
Unreal Tournament: The lighting system is pretty complex (or was, when it was released!) but it still isn't perfect. You still have to do some tricks to make your character to look like he's wearing shiny metal armour, bloody boots, dusty clothes and the like. This is a basic tutorial telling you about how to create realistic-looking glints of metal and where they should appear.
Step 1. Make a metal texture
You can see here that I've created a metal texture (see the metal texture tutorial) and selected a border of a few pixels. Using the dodge and burn tools, lighten the top surfaces and darken the bottom ones to create a three dimensional look.

Step 2. Make the first highlight
Create a new layer and use Dodge as its blend mode. Call this 'Dodge 1'. Use the Draw tool to make a single line of about 1 pixel wide using the colour 192,192,192 (a light grey). Draw the line similar to the one on the left. Now get the Eraser tool with Opacity 5 and Hardness 5 and erase the middles of the line very lightly. This makes the corners more prominent. Now Gaussian Blur it at a strength of 1 to make the line a little less obvious.

Step 3. Make a second, sharper highlight
Create another Dodge layer and repeat the same steps, but this time don't blur anything. Call this layer 'Dodge 2'.

Step 4. Draw a darker line
Copy the 'Dodge 2' layer. Create a new layer, call it 'Burn 1' and choose Burn as its blend mode. Now paste the 'Dodge 1' layer onto 'Burn 1' and it will magically turn darker, instead of lighter. Move this to just below the lighter lines.

Step 5. Add more details
That is the very basic way of creating good highlights. It's always easier to use a Dodge layer than it is to use the Dodge tool. It gives you more control over what you're creating. For now, merge the layers and add some more details. Scratches, stains, rust, pipes, dials - everything works. You can see in the image below what a few details can do to make it look more realistic.
Final image

Examples
You can see in the below image a few examples of the highlights and shadows that occur when light falls on different metals. You can see that the shallow ring indents in the metals cause highlights to be below the darker lines (giving an inner bevel look). Protruding rings cause the highlights to be above the darker lines (giving an outer bevel look). The blue sphere catches a very sharp point of light towards its centre. The rusted grille doesn't catch a sharp point of light - instead it just reflects some light near the bottom, giving the effect that it has come away from the metal. The chrome catches multiple points of light (have a look at the chrome tutorial), as well as the surrounding colours.
Different metals

Conclusion
Metals are by far the most popular texture used in video games. They're used for wall, ceiling and floor textures, armour, weapons, and robotic-type skins. Because of this it's important to get it looking right.

