Blend Modes in Paint Shop Pro 6
Created by : Redlemons
Tutorial copied with the friendly permission from Identity Crisis .
Introduction:
You should really read my tutorial on Layers before starting on this one, because if you don't understand layers you've got no chance of understanding how blend modes work!
Much like layers, blend modes can be hard to get your head around. Basically they determine how one layer interacts with another, which parts will show through, which colour will be dominant etc. They can be helpful for photo manipulation, making digital art, game skins, you name it. Most importantly, both layers and blend modes are extremely customisable. Unlike many filters, with blend modes you have a lot of control.
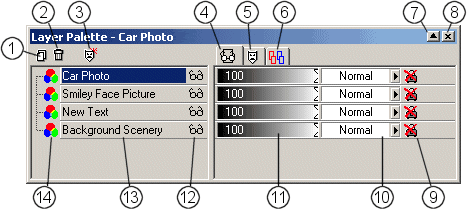
Below you can see a picture of the layer palette, and numbers pointing to each important part of it.

Much like layers, blend modes can be hard to get your head around. Basically they determine how one layer interacts with another, which parts will show through, which colour will be dominant etc. They can be helpful for photo manipulation, making digital art, game skins, you name it. Most importantly, both layers and blend modes are extremely customisable. Unlike many filters, with blend modes you have a lot of control.
Blend Modes
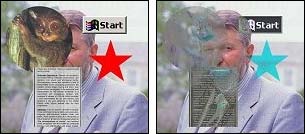
We finally get to the interesting part of this tutorial. Below is a picture of a nice chap from Flambard's amusement park, somewhere in the heart of England, I believe. Also on the image are a few small pictures of various sorts: the Windows Start Button, a red star, a newspaper clipping and a photograph of a small monkey. The first picture is of the Normal blend mode, where the top image is simply laid over the top of the bottom one, and obscures the relevant parts.
The picture on the left is the normal blend mode. The picture on the right is what the image after the appropriate blend mode has been applied. There is also a small amount of information which describes how the blend mode works.
Note:
Obviously, due to the number of images used in this tutorial, loading the images may take a while (depending on your Internet connection). Please be patient while they load.
Normal Blend Mode
Pixels in the top layer will not affect ones in the bottom layer, and vice versa. However, the opacity setting will change the appearance of the top layer. Note: the picture doesn't change in this example.

Darken Blend Mode
Only the pixels (picture elements) which are darker in the top layer than the corresponding bottom ones will appear.

Lighten Blend Mode
Only the pixels (picture elements) which are lighter in the top layer than the corresponding bottom ones will appear.

Hue Blend Mode
Applies the hue of the top layer to the corresponding pixels on the lower layer.

Saturation Blend Mode
Applies the saturation of the top layer to the corresponding pixels on the lower layer.

Colour Blend Mode
Applies both the hue and the saturation of the top layer to the corresponding pixels on the lower layer. The luminance (brightness) of the bottom layer isn't affected.

Luminance Blend Mode
Applies the luminance of the top layer to the corresponding pixels on the lower layer. The colour of the bottom layer isn't affected.

Multiply Blend Mode
The colours of the pixels of both layers are multiplied to produce a darker colour.

Screen Blend Mode
The total opposite of Multiply Blend Mode. Instead of appearing darker, the pixels are lighter.

Dissolve Blend Mode
Some pixels of the bottom layer are allowed to show through. This creates a sparkly effect, which isn't very apparent in the image on the left.

Overlay Blend Mode
This blend mode combines both Screen Blend Mode and Multiply Blend Mode.

Hard Light Blend Mode
Almost the same effect is achieved as with Overlay Blend Mode, but more colour is visible (as seen in the red star).

Soft Light Blend Mode
The effects of both Dodge Blend Mode and Burn Blend Mode are used.

Difference Blend Mode
Depending on which one is lighter, this subtracts the colour from the top layer from the colour of the bottom layer.

Dodge Blend Mode
Brightens the image up, a lot. The lighter the colour value, the lighter the image will become. Dodge Blend Mode has no effect on black.

Burn Blend Mode
Darkens the image a lot. The darker the colour value, the darker the image will become. Burn Blend Mode has no effect on white.

Exclusion Blend Mode
Very similar to the Difference Blend Mode, yet isn't as harsh.

Well, there you have it. Once you can get your head around these different blend modes you're well on your way. You'll probably never need to use more than two or three of these modes, but it's handy to just know that they're there if you need them. Good luck!
Created by : Redlemons
Tutorial copied with the friendly permission from Identity Crisis .
Introduction:
You should really read my tutorial on Layers before starting on this one, because if you don't understand layers you've got no chance of understanding how blend modes work!
Much like layers, blend modes can be hard to get your head around. Basically they determine how one layer interacts with another, which parts will show through, which colour will be dominant etc. They can be helpful for photo manipulation, making digital art, game skins, you name it. Most importantly, both layers and blend modes are extremely customisable. Unlike many filters, with blend modes you have a lot of control.
Below you can see a picture of the layer palette, and numbers pointing to each important part of it.

- This is the Create Layer button. With this you can make new layers and alter it's properties.
- The Delete Layer button. This (obviously) deletes a layer. If you accidentally press this, you can undo it by clicking on Edit > Undo.
- The Create Mask icon. Use this for making new masks for certain file types.
- The Appearance tab.
- The Masks tab
- The Group tab.
- Allow Auto Roll-Up / Lock Window Open. A new feature in Paint Shop Pro 6, this enables you to automatically minimise palettes if you find they are getting in the way.
- Close box.
- Lock Transparency is useful for making sure that you don't accidentally alter the transparency settings of the layer.
- Layer Blend Mode. See below.
- Layer Opacity (0 - 100%) This slider is for setting the transparency of a layer. The higher the slider the more opaque the layer. The lower the slider, the more see-through it is.
- Layer Visibility Toggle. This toggles whether the layer can be seen or not.It's useful when working on a layer further down in the stack which may be obscured by a higher layer.
- Layer Name. This tells you the name of the layer. Hold the mouse over this bar and PSP will give you a preview of what is in that particular layer.
- This icon indicates what type of layer it is: three coloured circles means a Raster Layer, a red and blue box shows a Vector Layer, and a black and white square indicates an Adjustment Layer.
Much like layers, blend modes can be hard to get your head around. Basically they determine how one layer interacts with another, which parts will show through, which colour will be dominant etc. They can be helpful for photo manipulation, making digital art, game skins, you name it. Most importantly, both layers and blend modes are extremely customisable. Unlike many filters, with blend modes you have a lot of control.
Blend Modes
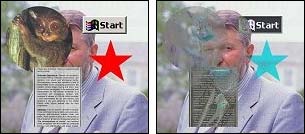
We finally get to the interesting part of this tutorial. Below is a picture of a nice chap from Flambard's amusement park, somewhere in the heart of England, I believe. Also on the image are a few small pictures of various sorts: the Windows Start Button, a red star, a newspaper clipping and a photograph of a small monkey. The first picture is of the Normal blend mode, where the top image is simply laid over the top of the bottom one, and obscures the relevant parts.
The picture on the left is the normal blend mode. The picture on the right is what the image after the appropriate blend mode has been applied. There is also a small amount of information which describes how the blend mode works.
Note:
Obviously, due to the number of images used in this tutorial, loading the images may take a while (depending on your Internet connection). Please be patient while they load.
Normal Blend Mode
Pixels in the top layer will not affect ones in the bottom layer, and vice versa. However, the opacity setting will change the appearance of the top layer. Note: the picture doesn't change in this example.

Darken Blend Mode
Only the pixels (picture elements) which are darker in the top layer than the corresponding bottom ones will appear.

Lighten Blend Mode
Only the pixels (picture elements) which are lighter in the top layer than the corresponding bottom ones will appear.

Hue Blend Mode
Applies the hue of the top layer to the corresponding pixels on the lower layer.

Saturation Blend Mode
Applies the saturation of the top layer to the corresponding pixels on the lower layer.

Colour Blend Mode
Applies both the hue and the saturation of the top layer to the corresponding pixels on the lower layer. The luminance (brightness) of the bottom layer isn't affected.

Luminance Blend Mode
Applies the luminance of the top layer to the corresponding pixels on the lower layer. The colour of the bottom layer isn't affected.

Multiply Blend Mode
The colours of the pixels of both layers are multiplied to produce a darker colour.

Screen Blend Mode
The total opposite of Multiply Blend Mode. Instead of appearing darker, the pixels are lighter.

Dissolve Blend Mode
Some pixels of the bottom layer are allowed to show through. This creates a sparkly effect, which isn't very apparent in the image on the left.

Overlay Blend Mode
This blend mode combines both Screen Blend Mode and Multiply Blend Mode.

Hard Light Blend Mode
Almost the same effect is achieved as with Overlay Blend Mode, but more colour is visible (as seen in the red star).

Soft Light Blend Mode
The effects of both Dodge Blend Mode and Burn Blend Mode are used.

Difference Blend Mode
Depending on which one is lighter, this subtracts the colour from the top layer from the colour of the bottom layer.

Dodge Blend Mode
Brightens the image up, a lot. The lighter the colour value, the lighter the image will become. Dodge Blend Mode has no effect on black.

Burn Blend Mode
Darkens the image a lot. The darker the colour value, the darker the image will become. Burn Blend Mode has no effect on white.

Exclusion Blend Mode
Very similar to the Difference Blend Mode, yet isn't as harsh.

Well, there you have it. Once you can get your head around these different blend modes you're well on your way. You'll probably never need to use more than two or three of these modes, but it's handy to just know that they're there if you need them. Good luck!

