
LOD Settings:
Created by Chris Taylor [aka - Big_Nasty]
This tutorial assumes that you can already skin, what it does teach you however is how to make sure that your skin looks as sharp as the standard UT player.
Tutorial copied with the friendly permission from Identity Crisis .
---------------------------------------------------------------------
I constantly hear people complain of how blurry their skins appear in UT. Many times Epic is blamed for some evil plot to keep good skinners from being the best they can be but this is very, very far from the truth. The fact of the matter is that it's a simple fix and skinners are not taking proper steps to insure that their lod (Level Of Detail) settings are correct when they import their textures into their packages.
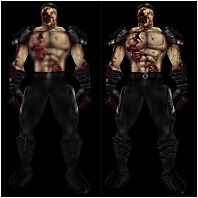
Below you will find before and after results of skins downloaded from various sites. Some of which we claim to be our (Top Shelf) skinners at that. If you like what you see then by all means read the rest of the tutorial and I will explain how you can get the same results, if not then leave now and forever hold your peace but don't come crying to me when your skins look like crap") These pictures were actually taken from UT player setup screens. The first pictures are before the LOD settings were fixed by me (how I received and installed the files) the second is after the LOD settings were fixed in UED (UnrealEd). As you can see, 90% of the artists detail is not seen simply because he did not take the time to set the proper level of detail tag for the package.
These pictures were actually taken from UT player setup screens. The first pictures are before the LOD settings were fixed by me (how I received and installed the files) the second is after the LOD settings were fixed in UED (UnrealEd). As you can see, 90% of the artists detail is not seen simply because he did not take the time to set the proper level of detail tag for the package.
If you would like to test this for yourself open up a user created skin in Unreal. Go to preferences and set world texture detail to low and skin detail to high. Look at the skin. Now go back and set your world texture to high and your Skin detail to low. WOW! But this is wrong, skins should look good when skin detail is high not world detail and I'm going to show you how to fix this.
What are LOD settings?
The first thing you should know is that LOD settings are used so that the unreal engine knows what to cut out of the picture so you can optimize your PC's performance. Go to your preferences menu. You will notice that you have drop down menus for Skin and World Texture Detail. The higher the setting the higher the detail but chances are you will lose performance. The lower the setting the uglier the game gets but you will likely get a performance boost. Personally I like to see what the skins are actually supposed to look before I go tweaking my game to where it looks very boring and ugly. Most players have there Skin detail set to high and there world texture detail set to medium or low because it's a nice trade off between looks and performance.
So what! Why is this a big deal?!
Well right now everyone is importing their textures with LOD settings that are ass backwards (pardon my language) unreal thinks the skin is a world texture so if you have low world texture settings then the skin is going to look like dodo Although it is a skin and you have your skin detail set to high the skin will remain looking like dodo because the author was not aware that UnrealEd imports textures to a package with a default setting of LODSET_World. This tag tells the engine that this is a world texture when in fact it is not. It is your responsibility to tell the engine what type of texture it is that you are trying to import. Ever heard the phrase "I'm not a mind reader"? Well neither is UnrealEd so don't be placing blame on Epic because your skin is blurry, place this blame on yourself. Then again this is the first tutorial I have ever seen concerning texture LOD settings so maybe it's nobodies fault <G> at any rate you get the idea. Same goes for textures you want to place on your levels. The LOD setting tag should then be set to world textures so the engine knows this is going on a wall and so on and so forth. This is normally not a problem though because UEd defaults to world LOD settings anyway.
Fine then, how do I fix this?
Like I said this is a very simple fix. Load up UnrealEd go smoke a cig or something while you wait. It should be back up by the time you finish. I have it down to an art now Kind of sucks but that's the way it has to be some times I guess. Ok UnrealEd should be open now.
MAKE SURE YOU DO THIS WITH EVERY TEXTURE IN THE PACKAGE OR YOUR SKIN WILL LOOK REALLY OUT OF WHACK.
Some areas will be crisp and others wont. We're looking to sharpen up your work.
Pretty nifty eh? I hope this tutorial helps the skinning community out. I myself enjoy user created skins (wish there were more than there are) I figure anything I can do to help would make everyone's gaming experience a bit better. Thank you for reading all the way through
Please feel free to distribute this tutorial in any way shape form or fashion. It was created for the good of the community. The more people that see this, the better off the skinning community will be. If you plan on placing this on a web site of any kind or publishing in any form of written media please contact me first. Please do not send requests for any custom Skin of any sort. If you have a question concerning this tutorial then by all means please contact me.
Created by Chris Taylor [aka - Big_Nasty]
This tutorial assumes that you can already skin, what it does teach you however is how to make sure that your skin looks as sharp as the standard UT player.
Tutorial copied with the friendly permission from Identity Crisis .
---------------------------------------------------------------------
I constantly hear people complain of how blurry their skins appear in UT. Many times Epic is blamed for some evil plot to keep good skinners from being the best they can be but this is very, very far from the truth. The fact of the matter is that it's a simple fix and skinners are not taking proper steps to insure that their lod (Level Of Detail) settings are correct when they import their textures into their packages.
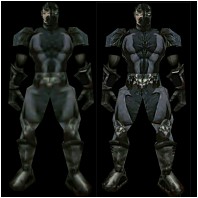
Below you will find before and after results of skins downloaded from various sites. Some of which we claim to be our (Top Shelf) skinners at that. If you like what you see then by all means read the rest of the tutorial and I will explain how you can get the same results, if not then leave now and forever hold your peace but don't come crying to me when your skins look like crap
These pictures were actually taken from UT player setup screens. The first pictures are before the LOD settings were fixed by me (how I received and installed the files) the second is after the LOD settings were fixed in UED (UnrealEd). As you can see, 90% of the artists detail is not seen simply because he did not take the time to set the proper level of detail tag for the package. If you would like to test this for yourself open up a user created skin in Unreal. Go to preferences and set world texture detail to low and skin detail to high. Look at the skin. Now go back and set your world texture to high and your Skin detail to low. WOW! But this is wrong, skins should look good when skin detail is high not world detail and I'm going to show you how to fix this.
What are LOD settings?
The first thing you should know is that LOD settings are used so that the unreal engine knows what to cut out of the picture so you can optimize your PC's performance. Go to your preferences menu. You will notice that you have drop down menus for Skin and World Texture Detail. The higher the setting the higher the detail but chances are you will lose performance. The lower the setting the uglier the game gets but you will likely get a performance boost. Personally I like to see what the skins are actually supposed to look before I go tweaking my game to where it looks very boring and ugly. Most players have there Skin detail set to high and there world texture detail set to medium or low because it's a nice trade off between looks and performance.

So what! Why is this a big deal?!
Well right now everyone is importing their textures with LOD settings that are ass backwards (pardon my language) unreal thinks the skin is a world texture so if you have low world texture settings then the skin is going to look like dodo
Although it is a skin and you have your skin detail set to high the skin will remain looking like dodo because the author was not aware that UnrealEd imports textures to a package with a default setting of LODSET_World. This tag tells the engine that this is a world texture when in fact it is not. It is your responsibility to tell the engine what type of texture it is that you are trying to import. Ever heard the phrase "I'm not a mind reader"? Well neither is UnrealEd so don't be placing blame on Epic because your skin is blurry, place this blame on yourself. Then again this is the first tutorial I have ever seen concerning texture LOD settings so maybe it's nobodies fault <G> at any rate you get the idea. Same goes for textures you want to place on your levels. The LOD setting tag should then be set to world textures so the engine knows this is going on a wall and so on and so forth. This is normally not a problem though because UEd defaults to world LOD settings anyway.Fine then, how do I fix this?
Like I said this is a very simple fix. Load up UnrealEd go smoke a cig or something while you wait. It should be back up by the time you finish. I have it down to an art now
Kind of sucks but that's the way it has to be some times I guess. Ok UnrealEd should be open now.
- Load up the package you have created for the skin. If you already have one started and are in the process of importing your textures just skip to the next step.
- Right click on a texture you have in the package window.
- You will notice an option to edit this texture. Click on that.
- Your texture will pop up along with a directory menu. You will notice a setting in this menu called Quality. Double click on that.
- Your menu will drop down and you will notice a setting that says LODSET_World click on that.
- You should now see a drop down arrow. Click on that and select LODSET_Skin
- Close the texture window and the menu window
MAKE SURE YOU DO THIS WITH EVERY TEXTURE IN THE PACKAGE OR YOUR SKIN WILL LOOK REALLY OUT OF WHACK.
Some areas will be crisp and others wont. We're looking to sharpen up your work.
- Once you have properly set every texture simply save and overwrite your existing package and you are all set. Now load up the skin in unreal and go back and look at the results
Pretty nifty eh? I hope this tutorial helps the skinning community out. I myself enjoy user created skins (wish there were more than there are) I figure anything I can do to help would make everyone's gaming experience a bit better. Thank you for reading all the way through
Please feel free to distribute this tutorial in any way shape form or fashion. It was created for the good of the community. The more people that see this, the better off the skinning community will be. If you plan on placing this on a web site of any kind or publishing in any form of written media please contact me first. Please do not send requests for any custom Skin of any sort. If you have a question concerning this tutorial then by all means please contact me.