UT - From an idea to the game:
Created by Rick Stirling and AcidDrone
Tutorial copied with the friendly permission from Identity Crisis .
After skinning for Quake for a long time, I decided to try my hand at an Unreal Tournament skin. It had to be deleted - it was terrible! All my experiences with Quake 3 had ruined me") I realized that there are a lot of pitfalls that can be made when making a skin for UT, so I decided to document the whole process.
I realized that there are a lot of pitfalls that can be made when making a skin for UT, so I decided to document the whole process.
Unfortunatley, I ran out of time, and the majority of this tutorial was written by AcidDrone.
This tutorial is going to be BIG, so it will be uploaded in several parts. Hopefully everyone will learn something from this tutorial - whether is be a new technique or just a new way at looking at something. If you have only just started skinning, I recommend you read all the other tutorials too - and just because you skinning for UT doesn't mean the Quake tutorials are useless!
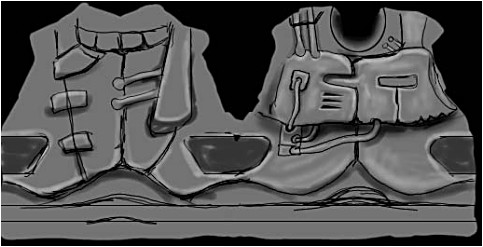
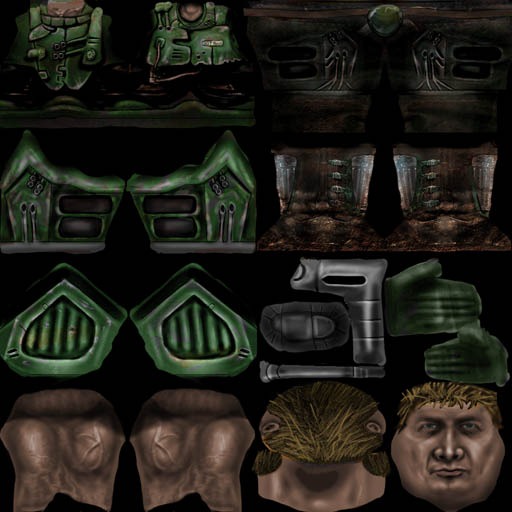
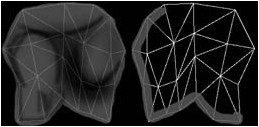
There are going to be some very big jumps in this tutorial, and some parts shown in minute detail. I now work at double size for all my skins - the UT skins for the male soldier are 4 textures each 256X256 pixels. I work on one large image which has all four textures joined together, which would make an image of 512X512, however I re-sized this to 1024X1024. This allows me to see what I'm doing better.
I also work in grayscale, then colour afterwards. This is personal preference, and not the easiest thing to learn. However, it does allow you to spend the time concentrating on shaping the skin, getting the shadows and highlights correct.
Sometimes the hardest part, sometimes the easiest. Where do ideas come from? Who knows - the world around you, a film, a book, a song. Anyway, you should have an idea of what you want to draw before you start. If you just start, all too often you will end up getting lost in the middle of a skin.
For my idea, I decided on the good old high-school-jock-ex-SAS-army-turned-space-marine character. Yes, I know its original, so please don't copy it! *grin*. No, actually I chose the old standby to show that even it can be made different. There is also a few elements of the Doom character in this skin.
As well as the skin idea in my head, I sketched out a few roughs, and decided on the style of armour I wanted. Now I had something to start from. I also decided to let the guy have bare arms so that I could draw the arm muscles.
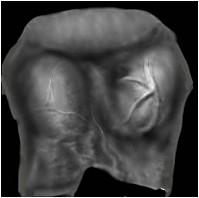
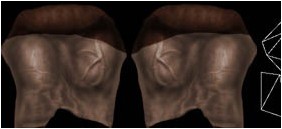
First thing I did was load a base mesh, then CREATED A NEW LAYER. Everything goes on new layers. I painted one of the arms gray, then using the burn (darken) tool I marked out the areas where the deltoids, biceps and triceps should be. I used various sized brushes at different opacities so that I didn't have any hard lines. You could also use the blur tool, I used to do that a lot, but I tend to stick with the lighten and darken tools.
Anyway, continuing from the above image, I have used the dodge(lighten) tool to help me define the lighter areas on the muscles. Its important to spend time on this - get a few reference photos from the net, or buy a bodybuilding magazine ( a better option). By continually using the dodge and burn tools, you build up a nice rounded gradient. Don't be tempted to use the gradient tool. You need to get a smooth gradient, my older worked suffered because I had gray with shadows and highlights. Note that I really work on the midtones.
Note: pressing ALT when using the dodge tool turns it into the burn tool and vice versa.
You can see that I applied a bit of noise to the image - just a tiny amount. It really improves the texture of the skin. The veins are in the correct place, I used the reference magazine, which also showed me that my triceps (that's the muscle on the back on the arm) was wrong. I did change it, but it looked bad on the model, so I changed it back to the simple version.
The deltoid (top bit, the shoulder part) actually comes about 1/2 way down the upper arm, however the model loses the top 1/4 of the upper arm in the shoulder pad. The biceps takes up the bottom half of the lower arm. It actually curves around the arm. These are nice things to remember, they will add a touch of realism.
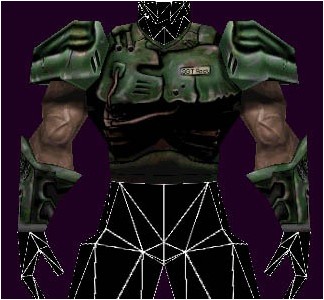
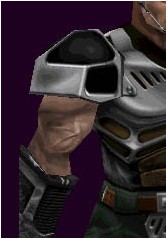
What I then did was to create another new layer, and painted over the arm area in a light brown skintone. I then set the blending mode of this layer to softlight at 100% opacity. Its skin! Rather than having to pick all the correct colours, I created the arm in gray, then used photoshop to work out the skin colours just by applying the skin as a new layer. I also took a quick screenshot in my demo version of Painter 3D, and you can see that the arm does actually look pretty good. ( I loaded the default skin, and then pasted my arm over the models arm).
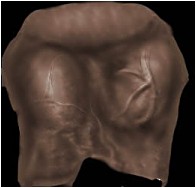
This bit was simple - I duplicated the arm and pasted it into the correct place, then on the skin colour layer I just painted the correct skin tone over the correct area. Then, on another NEW layer, I painted two dark bands in black paint, to simulate the shadows caused by the shoulder pads. I set this layers blending mode to be softlight at about 30%.
Tip! Rename each layer! At this stage in my image, my default photoshop layers would be called background, layer1, layer2, layer3 and layer4. I renamed them to mesh, right arm, left arm, skin colour and pad shadows. It makes the image easier to navigate.
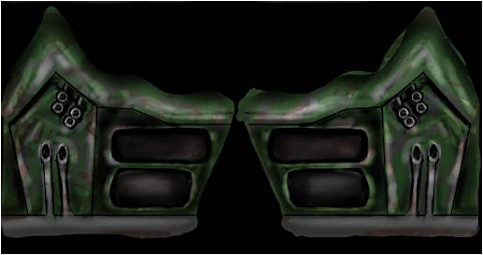
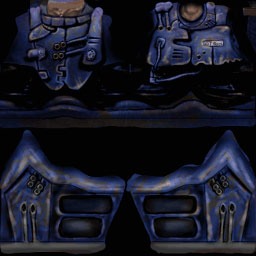
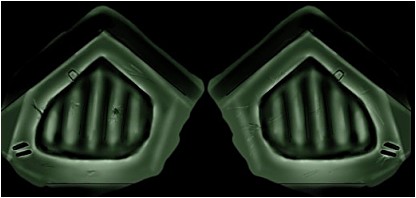
Onto the shoulder pads! On a new layer (of course!) I painted in the basic area of the shoulder pad, and used the burn tool to darken the areas under the pads. If this is the first time you are skinning a model, take a good look at an exisitng skin - both in 2d and on the model. It will give you clues to how the mesh fits the model.
The dark upside down V shape is actually the bottom of the pad - so its upside down
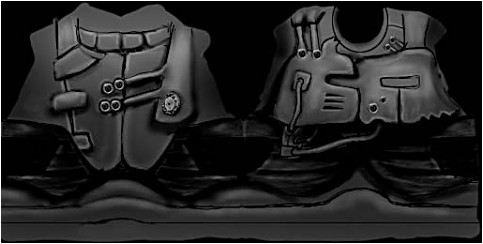
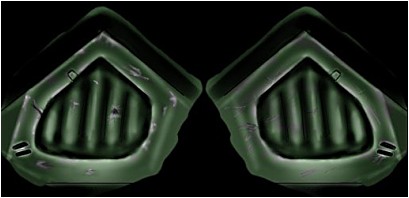
Whoa! A big step. Like I said, these are going to happen a lot. If you want details on good shading and highlighting, I written loads of other tutorials about it. I basically marked out what I wanted using the dodge. burn and airbrush tools, I shaded the dark areas and highlighted the lighter ones. All the time I of course consulted my initial sketches. I then copied and pasted the shoulder pad, so that I had 2 of them. You could leave them like this, and you would have metal shoulder pads, but lets go a bit further.
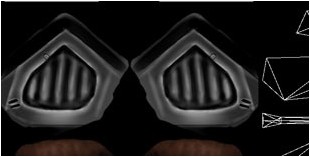
Here I've done things a few- on the shoulder pads I've used the dodge and burn on a very small brush size to create a few small scratches and dents. It makes the pads look a bit more used.
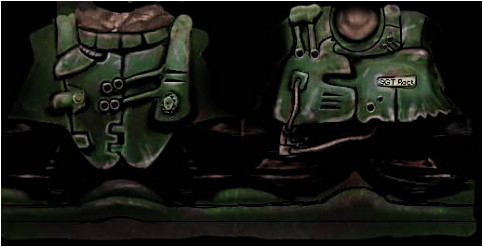
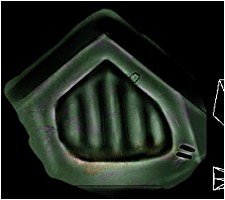
Then, on a new layer, I've painted green and applied the layer as a softlight layer. This colours the pads. I can play about with the hue and saturation until I'm happy.
Now this is cool! On the colour layer I've used the eraser tool to remove some of the colour, to let the metal show through. I've not done this just anywhere though - I've only done it over the scratches I created, and at the edges and corners of the pad.
This is to simulate the paint being chipped off when the armour has taken the brunt of a fall or when dropped in the armoury or suchlike.
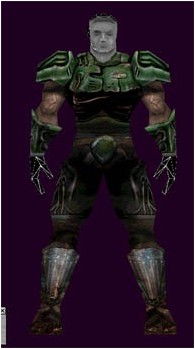
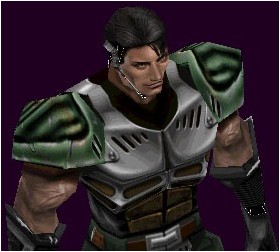
As well as overlaying colour, you can overlay other images. In the following shot of the pad, I've taken an image that I got from www.freetextures.com (edit by Lawgiver: this site is no longer available) and I applied it in softlight mode at about 10% over the pad. This gives a bit of texture and a bit of dirt to the image. Finally, a shot of my work pasted over a default skin, showing everything done so far.
Thats overs the main aspects of the way I work. Its going to get a lot faster from here on in.
Created by Rick Stirling and AcidDrone
Tutorial copied with the friendly permission from Identity Crisis .
After skinning for Quake for a long time, I decided to try my hand at an Unreal Tournament skin. It had to be deleted - it was terrible! All my experiences with Quake 3 had ruined me
I realized that there are a lot of pitfalls that can be made when making a skin for UT, so I decided to document the whole process. Unfortunatley, I ran out of time, and the majority of this tutorial was written by AcidDrone.
This tutorial is going to be BIG, so it will be uploaded in several parts. Hopefully everyone will learn something from this tutorial - whether is be a new technique or just a new way at looking at something. If you have only just started skinning, I recommend you read all the other tutorials too - and just because you skinning for UT doesn't mean the Quake tutorials are useless!
There are going to be some very big jumps in this tutorial, and some parts shown in minute detail. I now work at double size for all my skins - the UT skins for the male soldier are 4 textures each 256X256 pixels. I work on one large image which has all four textures joined together, which would make an image of 512X512, however I re-sized this to 1024X1024. This allows me to see what I'm doing better.
I also work in grayscale, then colour afterwards. This is personal preference, and not the easiest thing to learn. However, it does allow you to spend the time concentrating on shaping the skin, getting the shadows and highlights correct.
Sometimes the hardest part, sometimes the easiest. Where do ideas come from? Who knows - the world around you, a film, a book, a song. Anyway, you should have an idea of what you want to draw before you start. If you just start, all too often you will end up getting lost in the middle of a skin.
For my idea, I decided on the good old high-school-jock-ex-SAS-army-turned-space-marine character. Yes, I know its original, so please don't copy it! *grin*. No, actually I chose the old standby to show that even it can be made different. There is also a few elements of the Doom character in this skin.
As well as the skin idea in my head, I sketched out a few roughs, and decided on the style of armour I wanted. Now I had something to start from. I also decided to let the guy have bare arms so that I could draw the arm muscles.
First thing I did was load a base mesh, then CREATED A NEW LAYER. Everything goes on new layers. I painted one of the arms gray, then using the burn (darken) tool I marked out the areas where the deltoids, biceps and triceps should be. I used various sized brushes at different opacities so that I didn't have any hard lines. You could also use the blur tool, I used to do that a lot, but I tend to stick with the lighten and darken tools.
Anyway, continuing from the above image, I have used the dodge(lighten) tool to help me define the lighter areas on the muscles. Its important to spend time on this - get a few reference photos from the net, or buy a bodybuilding magazine ( a better option). By continually using the dodge and burn tools, you build up a nice rounded gradient. Don't be tempted to use the gradient tool. You need to get a smooth gradient, my older worked suffered because I had gray with shadows and highlights. Note that I really work on the midtones.
Note: pressing ALT when using the dodge tool turns it into the burn tool and vice versa.
You can see that I applied a bit of noise to the image - just a tiny amount. It really improves the texture of the skin. The veins are in the correct place, I used the reference magazine, which also showed me that my triceps (that's the muscle on the back on the arm) was wrong. I did change it, but it looked bad on the model, so I changed it back to the simple version.
The deltoid (top bit, the shoulder part) actually comes about 1/2 way down the upper arm, however the model loses the top 1/4 of the upper arm in the shoulder pad. The biceps takes up the bottom half of the lower arm. It actually curves around the arm. These are nice things to remember, they will add a touch of realism.
What I then did was to create another new layer, and painted over the arm area in a light brown skintone. I then set the blending mode of this layer to softlight at 100% opacity. Its skin! Rather than having to pick all the correct colours, I created the arm in gray, then used photoshop to work out the skin colours just by applying the skin as a new layer. I also took a quick screenshot in my demo version of Painter 3D, and you can see that the arm does actually look pretty good. ( I loaded the default skin, and then pasted my arm over the models arm).
This bit was simple - I duplicated the arm and pasted it into the correct place, then on the skin colour layer I just painted the correct skin tone over the correct area. Then, on another NEW layer, I painted two dark bands in black paint, to simulate the shadows caused by the shoulder pads. I set this layers blending mode to be softlight at about 30%.
Tip! Rename each layer! At this stage in my image, my default photoshop layers would be called background, layer1, layer2, layer3 and layer4. I renamed them to mesh, right arm, left arm, skin colour and pad shadows. It makes the image easier to navigate.
Onto the shoulder pads! On a new layer (of course!) I painted in the basic area of the shoulder pad, and used the burn tool to darken the areas under the pads. If this is the first time you are skinning a model, take a good look at an exisitng skin - both in 2d and on the model. It will give you clues to how the mesh fits the model.
The dark upside down V shape is actually the bottom of the pad - so its upside down
Whoa! A big step. Like I said, these are going to happen a lot. If you want details on good shading and highlighting, I written loads of other tutorials about it. I basically marked out what I wanted using the dodge. burn and airbrush tools, I shaded the dark areas and highlighted the lighter ones. All the time I of course consulted my initial sketches. I then copied and pasted the shoulder pad, so that I had 2 of them. You could leave them like this, and you would have metal shoulder pads, but lets go a bit further.
Here I've done things a few- on the shoulder pads I've used the dodge and burn on a very small brush size to create a few small scratches and dents. It makes the pads look a bit more used.
Then, on a new layer, I've painted green and applied the layer as a softlight layer. This colours the pads. I can play about with the hue and saturation until I'm happy.
Now this is cool! On the colour layer I've used the eraser tool to remove some of the colour, to let the metal show through. I've not done this just anywhere though - I've only done it over the scratches I created, and at the edges and corners of the pad.
This is to simulate the paint being chipped off when the armour has taken the brunt of a fall or when dropped in the armoury or suchlike.
As well as overlaying colour, you can overlay other images. In the following shot of the pad, I've taken an image that I got from www.freetextures.com (edit by Lawgiver: this site is no longer available) and I applied it in softlight mode at about 10% over the pad. This gives a bit of texture and a bit of dirt to the image. Finally, a shot of my work pasted over a default skin, showing everything done so far.
Thats overs the main aspects of the way I work. Its going to get a lot faster from here on in.
Last edited: