
Moose's Tips: Colour Mixing
Tutorial copied with the friendly permission from Identity Crisis .
This is a fun technique I developed a few weeks ago, that can produce some kick ass stuff. It can help you develop new colours, and also help you in filling out areas while skinning.
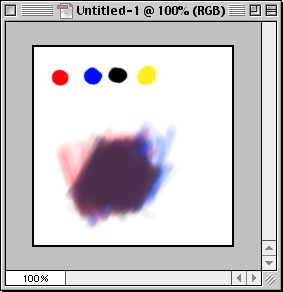
When you are doing this, you may want to open up your Swatches Pallete, so you can save your colour if you really like it. I have a ton of swatches... most of them are pre-sets, but I don't like to limit myself when using colour.Here is a screen of the colours I have.
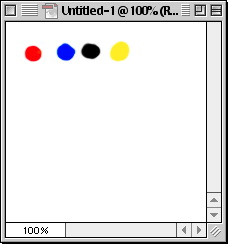
Step 1
Put however many colours down, they don't have to be pure colours (by this I mean red, blue, yellow, or whatever with 0 saturation and 0 brightness - assuming you use HSB colour).
Put the colours down in just little dots so you can sample them later.
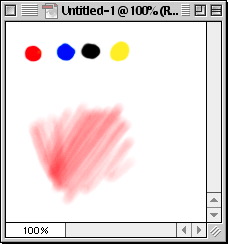
Step 2
Go in then with the airbrush and the first colour you want to lay out. Have the airbrush at a very low opacity so that you get some white in there. You don't have to do this... you can make the red (or whatever your first colour is) 100 % opaque and add colour from there.
The key with this technique is not to spend a lot of time doing anything. Go fast and you will get better results.
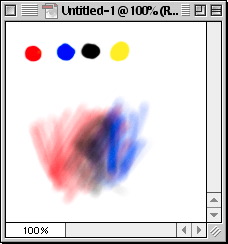
Step 3
put another colour in now. This is where the low pressure of the airbrush is KEY. If you don't do this you are most likely not going to get good results.
The areas where the colour are mixed are the areas where the blue colour shows the red through it.
There is some blue, black and a tinge of yellow in there.
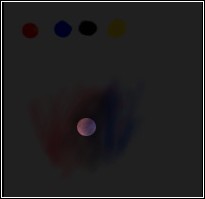
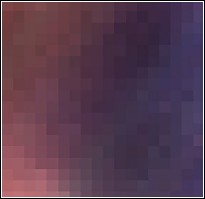
Step 4
Below (left) is an area in the image where I saw had the most colour mixing going on. So I zoomed WWWAAAAYYY in to show ya what exactly is going on with the colours. As you can see, The colour is getting further and further away from the initial red I started with. Below both these images you can see what colour came out of this.
Step 5
This is where the process starts getting fun. When you have the airbrush selected, you can hold down Alt (Option) on the keyboard and the brush will become and eye dropper and you can select whatever colour you want. This lets you go very fast, and selecting multiple colours and painting with them.
I ended up selecting colours here and there and everywhere and I ended up with this nice looking purple colour. If I wanted, I could choose this colour with the eye dropper, and click once in the Swatches pallete (where swatches don't exist) and save the colour so I can come back and use it later.
That wraps up this, I hope it made sense.
If you have any questions, feel free to Email me and I'll clear stuff up for ya.
Tutorial copied with the friendly permission from Identity Crisis .
This is a fun technique I developed a few weeks ago, that can produce some kick ass stuff. It can help you develop new colours, and also help you in filling out areas while skinning.
When you are doing this, you may want to open up your Swatches Pallete, so you can save your colour if you really like it. I have a ton of swatches... most of them are pre-sets, but I don't like to limit myself when using colour.Here is a screen of the colours I have.
Step 1
Put however many colours down, they don't have to be pure colours (by this I mean red, blue, yellow, or whatever with 0 saturation and 0 brightness - assuming you use HSB colour).
Put the colours down in just little dots so you can sample them later.
Step 2
Go in then with the airbrush and the first colour you want to lay out. Have the airbrush at a very low opacity so that you get some white in there. You don't have to do this... you can make the red (or whatever your first colour is) 100 % opaque and add colour from there.
The key with this technique is not to spend a lot of time doing anything. Go fast and you will get better results.
Step 3
put another colour in now. This is where the low pressure of the airbrush is KEY. If you don't do this you are most likely not going to get good results.
The areas where the colour are mixed are the areas where the blue colour shows the red through it.
There is some blue, black and a tinge of yellow in there.
Step 4
Below (left) is an area in the image where I saw had the most colour mixing going on. So I zoomed WWWAAAAYYY in to show ya what exactly is going on with the colours. As you can see, The colour is getting further and further away from the initial red I started with. Below both these images you can see what colour came out of this.
Step 5
This is where the process starts getting fun. When you have the airbrush selected, you can hold down Alt (Option) on the keyboard and the brush will become and eye dropper and you can select whatever colour you want. This lets you go very fast, and selecting multiple colours and painting with them.
I ended up selecting colours here and there and everywhere and I ended up with this nice looking purple colour. If I wanted, I could choose this colour with the eye dropper, and click once in the Swatches pallete (where swatches don't exist) and save the colour so I can come back and use it later.
That wraps up this, I hope it made sense.
If you have any questions, feel free to Email me and I'll clear stuff up for ya.