Chrome effects
Created by : Redlemons
Tutorial copied with the friendly permission from Identity Crisis .
Introduction
There ain't nothing cooler than chrome. It's shiny. It's smooth. It reflects lots of colours. Even though newer game engines have all these fancy shader and environment mapping technologies, it's still helpful to know how to create it. Read on, grasshopper...
Step 1. Make a metal texture
Yes, this is the standard first step for any metal-related tutorial. Check out my metal tutorial if you don't have any textures on-hand.

Step 2. Think of what colours you need
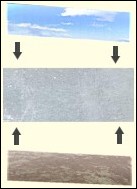
You have to realise how chrome 'works' and what it looks like. In most situation (like on cars) chrome has two main colours: blue and brown. The blue is the reflection from the sky above, the brown is the reflection of the road, dirt, whatever. You can see in the image at left that the sky's colour is reflected at the top of the chrome pipe, and the dirt at the bottom. Easy.
So, get a standard light blue colour and a standard brown or green.

Step 3. Colour or Hard Light?
Create a new layer, name it something like 'Blue & Brown'. It really doesn't matter what the layer is called, as long as you can recognise what it includes. Use the paintbrush tool to lightly colour the top and bottom of the pipe blue and brown respectively. Now set the blend mode to either Colour or Hard Light and see which looks better to you. You want the colours to show clearly, as well as get the metal texture from the layer below to show through.

Step 4. Shadows
You're almost there. Make another layer, name it 'Black'. Use the paintbrush tool with a black colour and a low opacity and a low hardness to liberally paint black at the very top and very bottom of the pipe, like you can see in the image at the left. You can use the opacity slider to change its opacity.
Now merge this layer so the highlights show properly. Check out the Highlights tutorial if you've never done them before.

Step 5. Highlights
Make sure you merge the other layers before you continue. Once merged, create another layer named 'Dodge' and set it to the Dodge blend mode. Using a light grey colour and the single line tool, draw a few straight horizontal lines along the pipe. Move them around to get them in the right position. You may want to Gaussian Blur them a little.
Now create yet another layer, name it 'Dodge 2'. This is for the sharper highlights. Do the same as above again to make the highlights a little clearer.

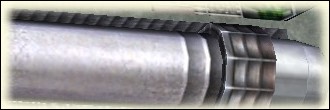
Final image

Conclusion
As you can see, chrome is a very easy effect to create. You can use different colours to get different effects. To achieve an even more impressive result you can find a photograph, screenshot or other image and blend it in to show a realistic reflection. If you use chrome for armour on a skin, make sure you reflect the colour of the rest of the skin, and not a blue sky colour.
Created by : Redlemons
Tutorial copied with the friendly permission from Identity Crisis .
Introduction
There ain't nothing cooler than chrome. It's shiny. It's smooth. It reflects lots of colours. Even though newer game engines have all these fancy shader and environment mapping technologies, it's still helpful to know how to create it. Read on, grasshopper...
Step 1. Make a metal texture
Yes, this is the standard first step for any metal-related tutorial. Check out my metal tutorial if you don't have any textures on-hand.

Step 2. Think of what colours you need
You have to realise how chrome 'works' and what it looks like. In most situation (like on cars) chrome has two main colours: blue and brown. The blue is the reflection from the sky above, the brown is the reflection of the road, dirt, whatever. You can see in the image at left that the sky's colour is reflected at the top of the chrome pipe, and the dirt at the bottom. Easy.
So, get a standard light blue colour and a standard brown or green.

Step 3. Colour or Hard Light?
Create a new layer, name it something like 'Blue & Brown'. It really doesn't matter what the layer is called, as long as you can recognise what it includes. Use the paintbrush tool to lightly colour the top and bottom of the pipe blue and brown respectively. Now set the blend mode to either Colour or Hard Light and see which looks better to you. You want the colours to show clearly, as well as get the metal texture from the layer below to show through.

Step 4. Shadows
You're almost there. Make another layer, name it 'Black'. Use the paintbrush tool with a black colour and a low opacity and a low hardness to liberally paint black at the very top and very bottom of the pipe, like you can see in the image at the left. You can use the opacity slider to change its opacity.
Now merge this layer so the highlights show properly. Check out the Highlights tutorial if you've never done them before.

Step 5. Highlights
Make sure you merge the other layers before you continue. Once merged, create another layer named 'Dodge' and set it to the Dodge blend mode. Using a light grey colour and the single line tool, draw a few straight horizontal lines along the pipe. Move them around to get them in the right position. You may want to Gaussian Blur them a little.
Now create yet another layer, name it 'Dodge 2'. This is for the sharper highlights. Do the same as above again to make the highlights a little clearer.

Final image

Conclusion
As you can see, chrome is a very easy effect to create. You can use different colours to get different effects. To achieve an even more impressive result you can find a photograph, screenshot or other image and blend it in to show a realistic reflection. If you use chrome for armour on a skin, make sure you reflect the colour of the rest of the skin, and not a blue sky colour.

