Moose's Tips: Photoshop Actions tutorial
Tutorial copied with the friendly permission from Identity Crisis .
Actions in photoshop are a WONDERFUL thing. This tutorial will show you the basics and the advanced uses of the actions palette. First I will start off with a description of the actions pallete and the basic parts of it. Actions basically let you record a string of things you do and allow you to replay them on the fly.
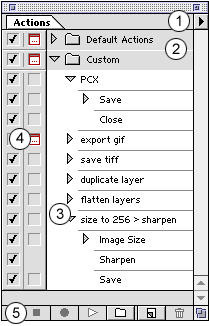
1. this is the options arrow thingy. Clicking on this will give you a long list of things that that you can do. The first section will let you add a new action, new set (the folders), delete the action/set, play the action or duplicate the action. There are also other options in there that will control how the action will run such as start recording, insert menu item and others. I will go into more detail on these later. The last option on this list is Button Mode. This makes all your actions into buttons so all you have to do is click them and they play. They are also colour coded.

2. These folder icons are action sets. They allow you to group the actions and organise them. As you can see here, I have made a separate group from the Default actions so that I know which ones are mine. These are real handy, make sure to use them.
3. This is an actual action; in the "flesh." You can name these actions whatever you want, but it helps if they are descriptive names to what they will do. Under each action, when unclasped shows what things they do. Certain items inside the actions can be unclasped to, to give more infomation about that item. For example, I have the Image Size action there, and inside, it tells that the image will be sized to 256 x 256 at 72 dpi. Then the next item will play, and it will run the Sharpen filter. Then it will save the file for safety measures. I will go into more detail what you can do here later.
4. This little red icon is used as a "Pause" or "break" in the action. You can put these anywhere in your action where additional options come up that you may want to change. For example, if you wanted to put a Gaussian Blur in the action, but you want to change it depending on the image, then you can click in the empty box to make the red icon appear, at the specific spot in the action. In my action, the break is at the point where the files save, so I can change the name of the file instead of resaving over the same file over and over. Fiddle around with this and you will be able to make it work for the best of you.
5. This is the control section of the palette. The one on the far left is the stop button this will stop every thing from recording. The button next to it is the record button. This will start recording. The one next to that is the play button, this will run the action on your image. The button that looks like a folder is the New Group button. The one next to that is the New Action button. And to the right of that is the delete action button. You can duplicate an action or section of an action by dragging and dropping the action on the New Action button.
Now that you know all about the actions palette, how about you learn about some uses for actions and something's to keep in mind.
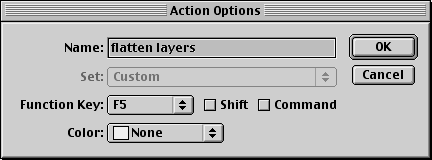
In my action pallete above, I have many things that do some very useful things. One of the most useful by far is the duplicate layer action and flatten layers action. Well actually, they all kick ass cause I use them all the time. Heh. One of the most streamline options of actions is that you can assign them to Function keys. You do this by either highlighting the action and going to Action options or by just double clicking on it.

Here you can see that I have the flatten layers action set to F5. So all I have to do is press F5 and it flattens all layers. The colour option there will just change the colour of the action in button mode. Some of the actions that I have are there only to do one specific thing such as Flatten Layers, Duplicate Layers, etc. You however can make them more complex. For example, if you want to make a row of dots, and instead of making a circle marquee, and dragging it left and risk not having the spaces be the same, you can make it an action. Here are the steps you can follow:
Make a new layer, with the circle thing on it.
Start recording the action.
Duplicate the layer
Move the layer left or right however many pixels
Stop action
Now when ever you run this action it will duplicate the current layer you are on and move it how ever many pixels you defined.
One thing that you MUST remember when recording your actions. THIS IS VERY IMPORTANT! when you are recording, Photoshop will read EVERYTHING that you do. If you make a mark with the paint brush, or whatever, it will read it and record it. So in short remember to only do what you really want to do. It helps to go through and do it once, then do it again recording so you can get some practice.
I'm not sure if I forgot anything or something... so if you have any more questions or concerns, just Email me and I will answer them.
Tutorial copied with the friendly permission from Identity Crisis .
Actions in photoshop are a WONDERFUL thing. This tutorial will show you the basics and the advanced uses of the actions palette. First I will start off with a description of the actions pallete and the basic parts of it. Actions basically let you record a string of things you do and allow you to replay them on the fly.
1. this is the options arrow thingy. Clicking on this will give you a long list of things that that you can do. The first section will let you add a new action, new set (the folders), delete the action/set, play the action or duplicate the action. There are also other options in there that will control how the action will run such as start recording, insert menu item and others. I will go into more detail on these later. The last option on this list is Button Mode. This makes all your actions into buttons so all you have to do is click them and they play. They are also colour coded.

2. These folder icons are action sets. They allow you to group the actions and organise them. As you can see here, I have made a separate group from the Default actions so that I know which ones are mine. These are real handy, make sure to use them.
3. This is an actual action; in the "flesh." You can name these actions whatever you want, but it helps if they are descriptive names to what they will do. Under each action, when unclasped shows what things they do. Certain items inside the actions can be unclasped to, to give more infomation about that item. For example, I have the Image Size action there, and inside, it tells that the image will be sized to 256 x 256 at 72 dpi. Then the next item will play, and it will run the Sharpen filter. Then it will save the file for safety measures. I will go into more detail what you can do here later.
4. This little red icon is used as a "Pause" or "break" in the action. You can put these anywhere in your action where additional options come up that you may want to change. For example, if you wanted to put a Gaussian Blur in the action, but you want to change it depending on the image, then you can click in the empty box to make the red icon appear, at the specific spot in the action. In my action, the break is at the point where the files save, so I can change the name of the file instead of resaving over the same file over and over. Fiddle around with this and you will be able to make it work for the best of you.
5. This is the control section of the palette. The one on the far left is the stop button this will stop every thing from recording. The button next to it is the record button. This will start recording. The one next to that is the play button, this will run the action on your image. The button that looks like a folder is the New Group button. The one next to that is the New Action button. And to the right of that is the delete action button. You can duplicate an action or section of an action by dragging and dropping the action on the New Action button.
Now that you know all about the actions palette, how about you learn about some uses for actions and something's to keep in mind.
In my action pallete above, I have many things that do some very useful things. One of the most useful by far is the duplicate layer action and flatten layers action. Well actually, they all kick ass cause I use them all the time. Heh. One of the most streamline options of actions is that you can assign them to Function keys. You do this by either highlighting the action and going to Action options or by just double clicking on it.

Here you can see that I have the flatten layers action set to F5. So all I have to do is press F5 and it flattens all layers. The colour option there will just change the colour of the action in button mode. Some of the actions that I have are there only to do one specific thing such as Flatten Layers, Duplicate Layers, etc. You however can make them more complex. For example, if you want to make a row of dots, and instead of making a circle marquee, and dragging it left and risk not having the spaces be the same, you can make it an action. Here are the steps you can follow:
Make a new layer, with the circle thing on it.
Start recording the action.
Duplicate the layer
Move the layer left or right however many pixels
Stop action
Now when ever you run this action it will duplicate the current layer you are on and move it how ever many pixels you defined.
One thing that you MUST remember when recording your actions. THIS IS VERY IMPORTANT! when you are recording, Photoshop will read EVERYTHING that you do. If you make a mark with the paint brush, or whatever, it will read it and record it. So in short remember to only do what you really want to do. It helps to go through and do it once, then do it again recording so you can get some practice.
I'm not sure if I forgot anything or something... so if you have any more questions or concerns, just Email me and I will answer them.

