UE3 - UT3 Need help with lighting/shadows

  • Two Factor Authentication is now available on BeyondUnreal Forums. To configure it, visit your Profile and look for the "Two Step Verification" option on the left side. We can send codes via email (may be slower) or you can set up any TOTP Authenticator app on your phone (Authy, Google Authenticator, etc) to deliver codes. It is highly recommended that you configure this to keep your account safe.

Horror

New Member
Jan 27, 2008
86
0
0
39
Australia, Melbourne
www.vertexmason.com
Hello mappers! This is my first post at these forums.

I started working on my first UT3 map around a week ago, and I'm pretty happy with the progress so far - but I'm having trouble with lighting.

I built the whole thing in 3ds Max, so it uses no BSP brushes, but I've come to realise that lightmapping wont work with overlapping UVs, or UVs which extend outside of a single uv sheet.

With that in mind, is there anything I can do to get some nice shadows (kinda like the ones cast by the preview rendering)? I've tried mucking around with dynamic lights, but I can't get them to cast shadows over my meshes. Right now I'm stuck with old fashion vertex lighting, and it kinda sucks.

Here's what I'm working on. WAR-Orbitsfear.

orbitsfear_06.jpg


orbitsfear_05.jpg
 

sWs»Cheapshot

New Member
Jan 20, 2008
236
0
0
Beauty of a map.

From Hourences.com:

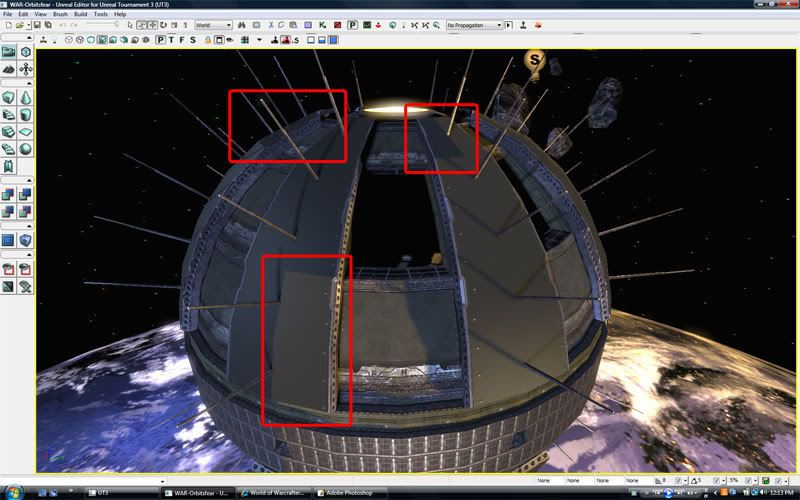
All meshes a user imports will always fall back to basic vertex lighting if the mesh was not properly configured for lightmapping. This test mesh was not properly configured for lightmapping and thus fell back on vertex lighting when it was rebuilding.

A mesh will not be lightmapped in UE3 if it does not has a correct UV set available for the lightmapper. In other words. A mesh must have a second (or 3rd/4th etc. dependent on the mesh) UV set/Unwrap layer available.

That second UV set must be correctly unwrapped.

No faces may take up the same position. Every face needs a unique location.
All faces must be in a single UV space.

The diffuse unwrapping of most objects does not fit those requirements. Often faces share identical positions of a skin or texture and they often are also a lot larger than a single UV space. Therefore, to not having to adjust the basic diffuse UV set one must make a second UV set that will be used solely for the lightmap info and will have zero influence on the basic diffuse unwrap.

In 3DsMax (multiple UV sets are supported by all major 3d packages including Maya) add a new Unwrap UVW modifier (a1) and be sure to set the Channel to 2 (a2). Next unwrap your mesh nicely according to the rules or, if you are too lazy, you can also let Max auto unwrap the mesh for you. To do so click on Mapping -> Flatten Mapping (a3).
If you wish to preview how the unwrap looks in Max be sure to add a material to the mesh that has been set to channel 2.

Once done with all of that export the mesh the regular way and import it in UED, also the regular way.

Please note that the newer versions of Unreal Engine 3 now also support in-editor generation of lightmap UV's, it is therefore not required to manually create the UV's anymore, but it usually does gets you a cleaner result.


In UED you also need to set a couple of important options.

Once the mesh has been imported double click it in the generic browser and in its properties be sure to set its LightmapCoordinateIndex to 1 and the LightmapResolution to 512.

The CoordindateIndex is what UV set/channel it should use. The Unreal Engine, unlike 3DSMax or Maya, starts counting from 0. Therefore the second UV channel you made in your 3D program of choice is not number 2 but number 1 in UED.
The LightmapResolution determines how detailed the lighting information will be on that particular mesh. Obviously you only want to enter numbers like 8,16, 32, 64, 128, 256, 512, 1024, 2048. Do not go over the top with the number. Every single instance of the mesh will get a unique lightmap of the size you entered. Too many too large lightmaps will kill the engine and drive up the filesize. Don't be afraid of using small lightmaps. Even a small lightmap can make things look great!

Once that's done place the mesh in your level and be sure to go to its properties. In there go to StaticMeshActor -> Lighting and StaticMeshComponent. In those two sub sections be sure to check bForceDirectLightmap and especially bOverrideLightMapResolution. The latter is enabled by default and unless you turn it off or enter a valid lightmapresolution in the property below, your mesh will not be LM'ed correctly!!
 

Horror

New Member
Jan 27, 2008
86
0
0
39
Australia, Melbourne
www.vertexmason.com
I can't seem to get it working. Say that my mesh lists 11 channels (in UEd, not 3ds Max) does that mean that my lightmap channel should be on number 12? I have not gone back into my model to manually give it a lightmap channel, but Hourences says that UEd is now able to generate them. Is this done automatically when you import a mesh, or is there something else I have to do to get it?
 

Horror

New Member
Jan 27, 2008
86
0
0
39
Australia, Melbourne
www.vertexmason.com
Ok,

To answer my last question for anyone else with the same confusion - I had mixed up the term "material id" with the term "material channel". So if you have 6 material IDs on your object, that doesn't mean that the lightmap is meant to be applied to ID 7 - it is completely different. All your texture coordinates should be under material channel 1, and the lightmap coordinates should be under channel 2 (or channel 0 for texture coords, and channel 1 for lightmap if we're talking about UnrealEd since it starts counting from 0 instead of 1). This can either be generated with a second UVunwrap modifier, or it can be applied later on in UnrealEd by opening the mesh editor and selcting "mesh > Generate Unique IDs" from the top menu. I would recommend laying out your lightmap info manually though, as both UnrealEd and Max (and probably Maya) do a terrible job of it.

Silly me!
 
Last edited:

Scourgewarper

Sewn back together wrong
Jan 20, 2008
26
0
0
Bolton UK
Glad you sorted it out, I was having the same problem myself a while back and this has answered it. Nice looking map btw look forward to playing it.
 

Horror

New Member
Jan 27, 2008
86
0
0
39
Australia, Melbourne
www.vertexmason.com
I've run into another snag ><

My lightmapping is working, but I'm also getting some strange effects on different parts of the mesh. It almost looks like it's trying to calculate the lighting on a per poly basis aswell as using the lightmap. I've tried mucking around with a few settings but havn't found the solution yet.

Anyone have any ideas?

orbitsfear_09.jpg
 

Horror

New Member
Jan 27, 2008
86
0
0
39
Australia, Melbourne
www.vertexmason.com
I removed a couple of the main lights, reducing my setup to one light source for the moon and one for the sun. I also bumped up the falloff exponent dramatically for these two lights. It seems to have solved the problem.


EDIT:

Actually, no it didn't. The glitch is still there. I just reduced/migrated the problem. Damn.

This engine is trying to drive me crazy :S
 
Last edited: