//===============
// Assault Rifle
// Also use as a test bed for the alpha ammo icons
//===============
class ddar extends AssaultRifle
config(user);
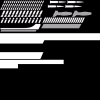
/* This texture is 512 x 512 pixels wide
AR: the bullets are 10 pixels wide by 17 pixels tall
bullet row icons (3 rows) can be drawn from pixels (0, 0) to (226, 52)
bullet row mask (3 rows) can be drawn from pixels (0, 170) to (226, 224)
Shotgun: the shells are 18 pixels wide by 34 pixels tall
shell row icons (1 row) can be drawn from pixels (0, 53) to (221, 86)
shell row mask (1 rows) can be drawn from pixels (0, 266) to (224, 303)
*/
#exec TEXTURE IMPORT File=classes\hud_ammo_alphas.dds Name=hud_ammo_alphas Mips=Off MASKED=0 ALPHA=1 LODSET=5 UCLAMPMODE=CLAMP VCLAMPMODE=CLAMP
var shader Ammo_Shad;
var TexScaler Ammo_Scaler;
var FinalBlend Ammo_FB;
var int ClipCount, OldClipCount; // just a test/convenience variable to show the clip count display changing.
var int ClipSize;
simulated function PostBeginPlay(){
super.PostBeginPlay();
ClipCount = ClipSize;
// Adjust the AmmoScaler.UOffset variable (in pixels) to move it along
Ammo_Scaler = TexScaler(Level.ObjectPool.AllocateObject(class'TexScaler'));
Ammo_Scaler.Material = texture'hud_ammo_alphas';
Ammo_Shad = shader(Level.ObjectPool.AllocateObject(class'shader'));
Ammo_shad.Diffuse = Ammo_Scaler;
Ammo_shad.Opacity = texture'hud_ammo_alphas';
Ammo_FB = FinalBlend(Level.ObjectPool.AllocateObject(class'FinalBlend'));
Ammo_FB.Material = Ammo_shad;
Ammo_FB.FrameBufferBlending = FB_brighten; // or maybe FB_AlphaBlend
}
simulated function Destroyed(){
// now free the materials.
Level.ObjectPool.FreeObject(Ammo_FB);
Level.ObjectPool.FreeObject(Ammo_shad);
Level.ObjectPool.FreeObject(Ammo_scaler);
super.Destroyed();
}
simulated function IncrementFlashCount(int Mode)
{
super.IncrementFlashCount(Mode);
ClipCount--;
if(ClipCount < 0) ClipCount = ClipSize; // constantly roll over
}
simulated event RenderOverlays( Canvas C )
{
local int ClipRemainder;
if (Instigator == None)
return;
Super.RenderOverlays(C);
// now draw the ammo status to the upper left corner of the canvas
// AR bullet list
if(true){
//ClipSize = 60; // this is how many little icons are in the texture
if(OldClipCount != ClipCount){
//ClipRemainder = ClipCount % ClipSize;// constantly roll this over and grab the amount less than the clip size
ClipRemainder = ClipCount; // yeah this is redundant, but left it in incase you want to roll-over a byte for this example purposes
// three rows with three different cases to take into account the skew
// since each row is slightly offset to the left from the one above
if(ClipRemainder > 40){
// UOffset = Initial pixel skew offset into the row + (AR Bullet Pixel width * (empties in row))
Ammo_Scaler.UOffset = 0 + (10 * (20 - (ClipRemainder - 40)));
Ammo_Scaler.VOffset = 170;
}else if (ClipRemainder > 20){
Ammo_Scaler.UOffset = 5 + (10 * (20 - (ClipRemainder - 20)));
Ammo_Scaler.VOffset = 188;
}else{
Ammo_Scaler.UOffset = 10 + (10 * (20 - ClipRemainder));
Ammo_Scaler.VOffset = 206; // so that only the top row gets a color, the bottom two rows will be in black
}
OldClipCount = ClipCount;
}
C.Style = 5;
C.SetDrawColor (255, 255, 255, 255); // tweak this for a different color
C.SetPos(C.SizeX * 0.03, C.SizeY * 0.15); // start a little ways away from the upper left corner
// now draw AR bullet 'chunk' out of the Final blend
C.DrawTile(Ammo_FB, C.SizeX * 0.2, C.SizeY * 0.055, 0.0, 0.0, 226, 52);
}
}
defaultproperties
{
ClipSize=60 // adjust this based on which bullet icons you are using
PickupClass=class'ddarPickup'
AttachmentClass=class'AssaultAttachment'
}