
Skinning a realistic weapon - Creating skin meshes
Created by MoRPHeuSS - Website : Titaniumfrag
Tutorial copied with the friendly permission from Identity Crisis .
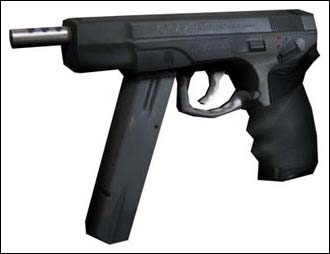
Welcome to the second Titaniumfrag modelling tutorial. I am going to show you as best I can how to skin a realistic, low polygon gun. This would be ideal for weapon models for games like Quake, UT or Half-Life. You will need a version of 3D Studio Max, and the plugin, Texporter (available for free from Cuneyt Ozda's site). Modelling takes time, but if you work at it, you can create stunning results. This tutorial is aimed at intermediate users, so I assume you know most of the basics of Max such as viewport control and object creation. Remember to save frequently, whatever you are doing. There's nothing more annoying that completing a complicated piece of a model only to have 3DS Max crash out for no good reason. Don't rely on Max's auto-backup feature - it sometimes doesn't save the whole scene. For this tutorial, I assume you have modelled a gun, probably from my first tutorial. Skinning (or texture-mapping) is a good way of getting all the detail of a model's texture onto one image. If you open up a Quake 3: Arena weapon skin, for example, you will see that all the parts of the weapon are laid out in a 128x128 TGA texture.
1. Open the MAX file of the weapon you are going to texture-map. I'll be using the one I made in the last tutorial. The basic side-on texture doesn't look too bad, but there are places where detail is missing and the texture smears and stretches. Texture-mapping helps to get rid of distortion and give an equal level of detail all round.
2. Firstly, give the model a flat red (so it shows up well in the viewport) default material. This is easier to look at and understand than a textured model for the time being. If you have a UVW Mapping modifier on top of the editable mesh, either delete it or collapse it - it isn't going to be used anyway.
3. I would recommend turning on "Edged Faces" in the perspective viewport. Right-click on the Perspective viewport at the top left, and select Edged Faces. You will see a wireframe overlayed on your model in the 3D view. This is useful for knowing where all the faces and polygons are on the model. We will be taking the model apart piece by piece, then putting it back in a new shape.
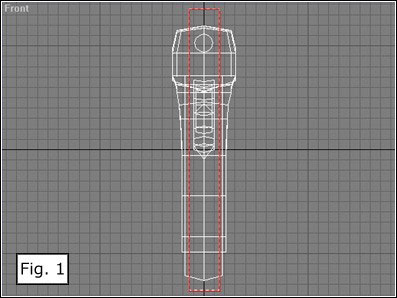
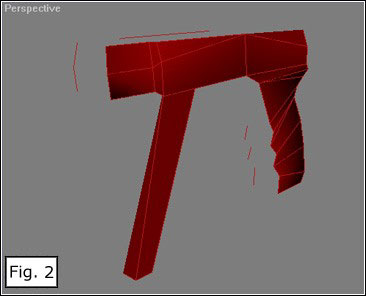
4. Select the mesh and go into Sub-Object Polygon mode. The aim of this exercise now is to detach parts of the mesh that are main areas of concentration for the texture. First, get rid of unwanted faces by selecting an area in the front viewport, the size of the red box in Fig. 1. This should select all of the middle faces while leaving the sides untouched. With the faces selected, click Hide in the Selection rollout of the Editable Mesh. This should leave you with only the side faces of the gun, which will look something like Fig. 2.
5. Now to detach the faces that are shown. Since both sides look the same, they will have the same texture and so can be detached back-to-back. In the front view, click and drag to select all the shown faces. Under the Edit Geometry rollout of the Editable Mesh, click Detach. This will remove the faces into a new object. In the box that pops up, type "A" in the Detach As field. This will name the new object "A". I normally detach objects in alphabetical order, but you can use numbers if you want. It is useful to know the order in which they were detached.
6. Now, click Unhide All in the Selection rollout of the Editable Mesh. This will show the faces you hid before. Then click the Display tab on the right-hand toolbar (the icon looks like a monitor with a red cone and blue cylinder in it) and click on Hide Unselected in the Hide rollout. This hides the object "A" from view, leaving you with a gun with no sides.
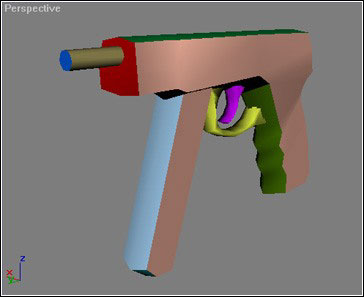
7. Now we must continue detaching pieces. Pick areas that look like they should be textured together, such as the front/back of the ammo clip. Try to make as few pieces as possible. Detach the front/back of the ammo clip (not the bottom) in the same way as the sides. Select the faces, and click Detach. Name this object "B". Keep going until it is all separated and there are no more faces to select on the original mesh. Unhide All just to check you haven't missed anything. Exit Sub-Object mode and delete the original mesh (it has no vertices or faces so it's useless now). Here is a picture of the parts I separated. There is a different colour for each part to show how I split up the mesh.
8. Save the file if you haven't already. THIS PART IS IMPORTANT! We now need to make a backup of the objects to show how the original shape looked. Select all the pieces using the Select By Name button (just to the left of the move tool button). Now, select the move tool, hold down SHIFT and move all the pieces to the right in the Front viewport. When you stop moving, the Clone Options box should pop up. This is because holding down SHIFT and moving objects copies them. The default clone options are fine for what we are doing. Just click OK. You should now have 2 guns in your scene. Select the one you just made (it should be selected already actually) and click the Group drop-down menu in the main menu. Select Group (all the other options will be greyed out). Call the group "Backup". Hide the backup group.
9. Now that a backup has been created, we have to lay out the mesh parts in a square area. Select part "A" and move it away from the main model. I normally change the Perspective view to Front by pressing the F key with the Perspective viewport selected to make this task easier, but you can use any viewport except Perspective. Now, move the other parts (rotate them until they face the front if they do not already) and keep moving them around until they all fit together neatly (not overlapping or touching each other - a small space between each part is good). They do not have to be in any particular order, just move them round until they all go nicely into a square area in the viewport - turn on the Grid by pressing the G key to see if it's a square or not (just count the grid lines). It doesn't matter if the objects aren't aligned in the other viewports, only the one you're concentrating on matters. It can take a long time to make them all fit - feel free to Scale them up or down to make them fit better. Don't make the parts too small though, or there will be no detail on them when you do the texture. Mine ended up looking like this:

10. We're nearly finished now! Use the Select By Name button to select object "A". Go to it's Editable Mesh, and click Attach List. From the list that pops up, select all the lettered objects (mine were "B" to "O") and click Attach. This has made your model one whole mesh again, but now it's a different shape to the gun you started with!
11. Now to apply a UVW Map. Select object "A" and select UVW Map from the Modifier List. Click on the viewport you aligned the objects in and click View Align in the UVW Map options, then click Fit. There should now be an orange box surrounding your mesh, with all the objects inside it.
12. Go back to the Display tab, and click Unhide All under the Hide rollout. This should make your backup visible again. Select the backup, and click Ungroup in the Group drop-down menu. Use the Select By Name button to select the object called "A01". Again, use Attach List to attach the other pieces to it ("B01" to "O01"). DO NOT ATTACH YOUR ORIGINAL MESH TO THIS!
13. Click the Create tab on the right-hand toolbar and then select Compound Objects from the list in Geometry. There should now be a button marked "Morph" on the right. Click on it with object "A" selected - NOT "A01". Click the Pick Target button from the rollout that appears, then click on object "A01". Zap! Your object looks like a gun again! Only this time, it has different UVW co-ordinates.
14. Save the file and delete the backup mesh, you won't need it anymore. Select object "A" and rename it as "Gun" or something, just to make things easier. Now, go back into the Modify tab and right-click on the item named Morph. Select Convert to: Editable Mesh. Now, go into Sub-Object Vertex mode and click and drag to select ALL of the vertices. Click on the Selected button under the Weld part of the Edit Geometry rollout. Exit Sub-Object mode. You have just connected all the vertices that were split apart when you detached the pieces of the mesh. This makes the mesh smoother and seamless. The gun isn't quite right yet, though. Select the Scale tool and then right click on the Scale tool to open up the Transform Type-In. With your mesh selected, make sure that all the numbers read 100.0. If they don't, change them so that they do. This gets rid of any scaling you did when you were arranging the pieces. You might need to rotate the gun too. Click on the rotate tool with the Type-In still open. If your gun looks like it's been rotated round at all, then type in - X: 90.0 Y: -0.0 Z: -90.0. This should reset your gun's rotation.
15. Now to export the gun's texture. Click on the Utility tab (the one on the far right of the right-hand toolbar) and look for a Texporter button. If it isn't there, click the More... button and select Texporter from that list. If it still isn't there, then you haven't installed Cuneyt Ozdas' Texporter plugin correctly.
16. Once you have clicked the Texporter button, a new rollout will open. In the Width and Height fields, type "256". This will make your texture 256x256 pixels in size. Next, turn off Polygon Fill (it's spelt wrongly in the plugin - Ploygon Fill!). Also turn off Backface Cull and Mark Overlaps. Select "All Lines" under the Edges part. Under Colorize By:, select Constant, and choose white from the colour picker. These options mean that you will have an image which will show all the edges of the model's faces as white lines on the image.
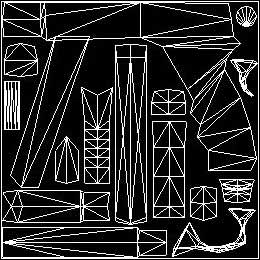
17. Click the Pick Object button, and select your gun mesh. A window should open with a black-and-white image of your texture as a wireframe in it. Click on the Save Bitmap button (it looks like a floppy disk) and choose a filename (.BMP or .TGA are the best formats) and somewhere to save the image. My image (known as a "skinmesh") looked like this:
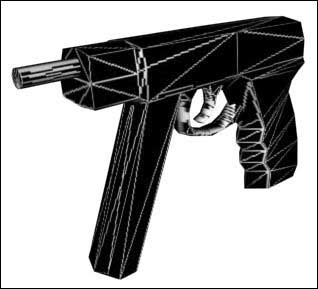
18. Now to make your skinmesh show up on the model. All you have to do is make a new material, click on the small square button next to the Diffuse colour picker, select Bitmap from the list, and then load your image into the slot. Render a quick sample (use "SHIFT+E") to see what it looks like. If you've done everything right, you should see white lines covering your model in all the right places! You will see that there is roughly an equal amount of detail all over the model. Here's a small image of what my gun looked like:
Finished! Now all you need to do is make a texture! In fact, I think I'll write a tutorial on how to texture models using Photoshop! Keep an eye out for it, it'll be along before you know it!
Created by MoRPHeuSS - Website : Titaniumfrag
Tutorial copied with the friendly permission from Identity Crisis .
Welcome to the second Titaniumfrag modelling tutorial. I am going to show you as best I can how to skin a realistic, low polygon gun. This would be ideal for weapon models for games like Quake, UT or Half-Life. You will need a version of 3D Studio Max, and the plugin, Texporter (available for free from Cuneyt Ozda's site). Modelling takes time, but if you work at it, you can create stunning results. This tutorial is aimed at intermediate users, so I assume you know most of the basics of Max such as viewport control and object creation. Remember to save frequently, whatever you are doing. There's nothing more annoying that completing a complicated piece of a model only to have 3DS Max crash out for no good reason. Don't rely on Max's auto-backup feature - it sometimes doesn't save the whole scene. For this tutorial, I assume you have modelled a gun, probably from my first tutorial. Skinning (or texture-mapping) is a good way of getting all the detail of a model's texture onto one image. If you open up a Quake 3: Arena weapon skin, for example, you will see that all the parts of the weapon are laid out in a 128x128 TGA texture.
1. Open the MAX file of the weapon you are going to texture-map. I'll be using the one I made in the last tutorial. The basic side-on texture doesn't look too bad, but there are places where detail is missing and the texture smears and stretches. Texture-mapping helps to get rid of distortion and give an equal level of detail all round.
2. Firstly, give the model a flat red (so it shows up well in the viewport) default material. This is easier to look at and understand than a textured model for the time being. If you have a UVW Mapping modifier on top of the editable mesh, either delete it or collapse it - it isn't going to be used anyway.
3. I would recommend turning on "Edged Faces" in the perspective viewport. Right-click on the Perspective viewport at the top left, and select Edged Faces. You will see a wireframe overlayed on your model in the 3D view. This is useful for knowing where all the faces and polygons are on the model. We will be taking the model apart piece by piece, then putting it back in a new shape.
4. Select the mesh and go into Sub-Object Polygon mode. The aim of this exercise now is to detach parts of the mesh that are main areas of concentration for the texture. First, get rid of unwanted faces by selecting an area in the front viewport, the size of the red box in Fig. 1. This should select all of the middle faces while leaving the sides untouched. With the faces selected, click Hide in the Selection rollout of the Editable Mesh. This should leave you with only the side faces of the gun, which will look something like Fig. 2.
5. Now to detach the faces that are shown. Since both sides look the same, they will have the same texture and so can be detached back-to-back. In the front view, click and drag to select all the shown faces. Under the Edit Geometry rollout of the Editable Mesh, click Detach. This will remove the faces into a new object. In the box that pops up, type "A" in the Detach As field. This will name the new object "A". I normally detach objects in alphabetical order, but you can use numbers if you want. It is useful to know the order in which they were detached.
6. Now, click Unhide All in the Selection rollout of the Editable Mesh. This will show the faces you hid before. Then click the Display tab on the right-hand toolbar (the icon looks like a monitor with a red cone and blue cylinder in it) and click on Hide Unselected in the Hide rollout. This hides the object "A" from view, leaving you with a gun with no sides.
7. Now we must continue detaching pieces. Pick areas that look like they should be textured together, such as the front/back of the ammo clip. Try to make as few pieces as possible. Detach the front/back of the ammo clip (not the bottom) in the same way as the sides. Select the faces, and click Detach. Name this object "B". Keep going until it is all separated and there are no more faces to select on the original mesh. Unhide All just to check you haven't missed anything. Exit Sub-Object mode and delete the original mesh (it has no vertices or faces so it's useless now). Here is a picture of the parts I separated. There is a different colour for each part to show how I split up the mesh.
8. Save the file if you haven't already. THIS PART IS IMPORTANT! We now need to make a backup of the objects to show how the original shape looked. Select all the pieces using the Select By Name button (just to the left of the move tool button). Now, select the move tool, hold down SHIFT and move all the pieces to the right in the Front viewport. When you stop moving, the Clone Options box should pop up. This is because holding down SHIFT and moving objects copies them. The default clone options are fine for what we are doing. Just click OK. You should now have 2 guns in your scene. Select the one you just made (it should be selected already actually) and click the Group drop-down menu in the main menu. Select Group (all the other options will be greyed out). Call the group "Backup". Hide the backup group.
9. Now that a backup has been created, we have to lay out the mesh parts in a square area. Select part "A" and move it away from the main model. I normally change the Perspective view to Front by pressing the F key with the Perspective viewport selected to make this task easier, but you can use any viewport except Perspective. Now, move the other parts (rotate them until they face the front if they do not already) and keep moving them around until they all fit together neatly (not overlapping or touching each other - a small space between each part is good). They do not have to be in any particular order, just move them round until they all go nicely into a square area in the viewport - turn on the Grid by pressing the G key to see if it's a square or not (just count the grid lines). It doesn't matter if the objects aren't aligned in the other viewports, only the one you're concentrating on matters. It can take a long time to make them all fit - feel free to Scale them up or down to make them fit better. Don't make the parts too small though, or there will be no detail on them when you do the texture. Mine ended up looking like this:
10. We're nearly finished now! Use the Select By Name button to select object "A". Go to it's Editable Mesh, and click Attach List. From the list that pops up, select all the lettered objects (mine were "B" to "O") and click Attach. This has made your model one whole mesh again, but now it's a different shape to the gun you started with!
11. Now to apply a UVW Map. Select object "A" and select UVW Map from the Modifier List. Click on the viewport you aligned the objects in and click View Align in the UVW Map options, then click Fit. There should now be an orange box surrounding your mesh, with all the objects inside it.
12. Go back to the Display tab, and click Unhide All under the Hide rollout. This should make your backup visible again. Select the backup, and click Ungroup in the Group drop-down menu. Use the Select By Name button to select the object called "A01". Again, use Attach List to attach the other pieces to it ("B01" to "O01"). DO NOT ATTACH YOUR ORIGINAL MESH TO THIS!
13. Click the Create tab on the right-hand toolbar and then select Compound Objects from the list in Geometry. There should now be a button marked "Morph" on the right. Click on it with object "A" selected - NOT "A01". Click the Pick Target button from the rollout that appears, then click on object "A01". Zap! Your object looks like a gun again! Only this time, it has different UVW co-ordinates.
14. Save the file and delete the backup mesh, you won't need it anymore. Select object "A" and rename it as "Gun" or something, just to make things easier. Now, go back into the Modify tab and right-click on the item named Morph. Select Convert to: Editable Mesh. Now, go into Sub-Object Vertex mode and click and drag to select ALL of the vertices. Click on the Selected button under the Weld part of the Edit Geometry rollout. Exit Sub-Object mode. You have just connected all the vertices that were split apart when you detached the pieces of the mesh. This makes the mesh smoother and seamless. The gun isn't quite right yet, though. Select the Scale tool and then right click on the Scale tool to open up the Transform Type-In. With your mesh selected, make sure that all the numbers read 100.0. If they don't, change them so that they do. This gets rid of any scaling you did when you were arranging the pieces. You might need to rotate the gun too. Click on the rotate tool with the Type-In still open. If your gun looks like it's been rotated round at all, then type in - X: 90.0 Y: -0.0 Z: -90.0. This should reset your gun's rotation.
15. Now to export the gun's texture. Click on the Utility tab (the one on the far right of the right-hand toolbar) and look for a Texporter button. If it isn't there, click the More... button and select Texporter from that list. If it still isn't there, then you haven't installed Cuneyt Ozdas' Texporter plugin correctly.
16. Once you have clicked the Texporter button, a new rollout will open. In the Width and Height fields, type "256". This will make your texture 256x256 pixels in size. Next, turn off Polygon Fill (it's spelt wrongly in the plugin - Ploygon Fill!). Also turn off Backface Cull and Mark Overlaps. Select "All Lines" under the Edges part. Under Colorize By:, select Constant, and choose white from the colour picker. These options mean that you will have an image which will show all the edges of the model's faces as white lines on the image.
17. Click the Pick Object button, and select your gun mesh. A window should open with a black-and-white image of your texture as a wireframe in it. Click on the Save Bitmap button (it looks like a floppy disk) and choose a filename (.BMP or .TGA are the best formats) and somewhere to save the image. My image (known as a "skinmesh") looked like this:
18. Now to make your skinmesh show up on the model. All you have to do is make a new material, click on the small square button next to the Diffuse colour picker, select Bitmap from the list, and then load your image into the slot. Render a quick sample (use "SHIFT+E") to see what it looks like. If you've done everything right, you should see white lines covering your model in all the right places! You will see that there is roughly an equal amount of detail all over the model. Here's a small image of what my gun looked like:
Finished! Now all you need to do is make a texture! In fact, I think I'll write a tutorial on how to texture models using Photoshop! Keep an eye out for it, it'll be along before you know it!